 IndieBase

Table of Contents
Managing an Event
Set up and administer an event — details, shifts, event admins, the external dashboard, and the audit trail. For live dispatch, head to the Control Room.
Managing an Event
The event page is where you set up and administer an event — its details, shifts, admins, and external dashboard. It doesn't handle live dispatch; for that, open the Control Room.
Overview
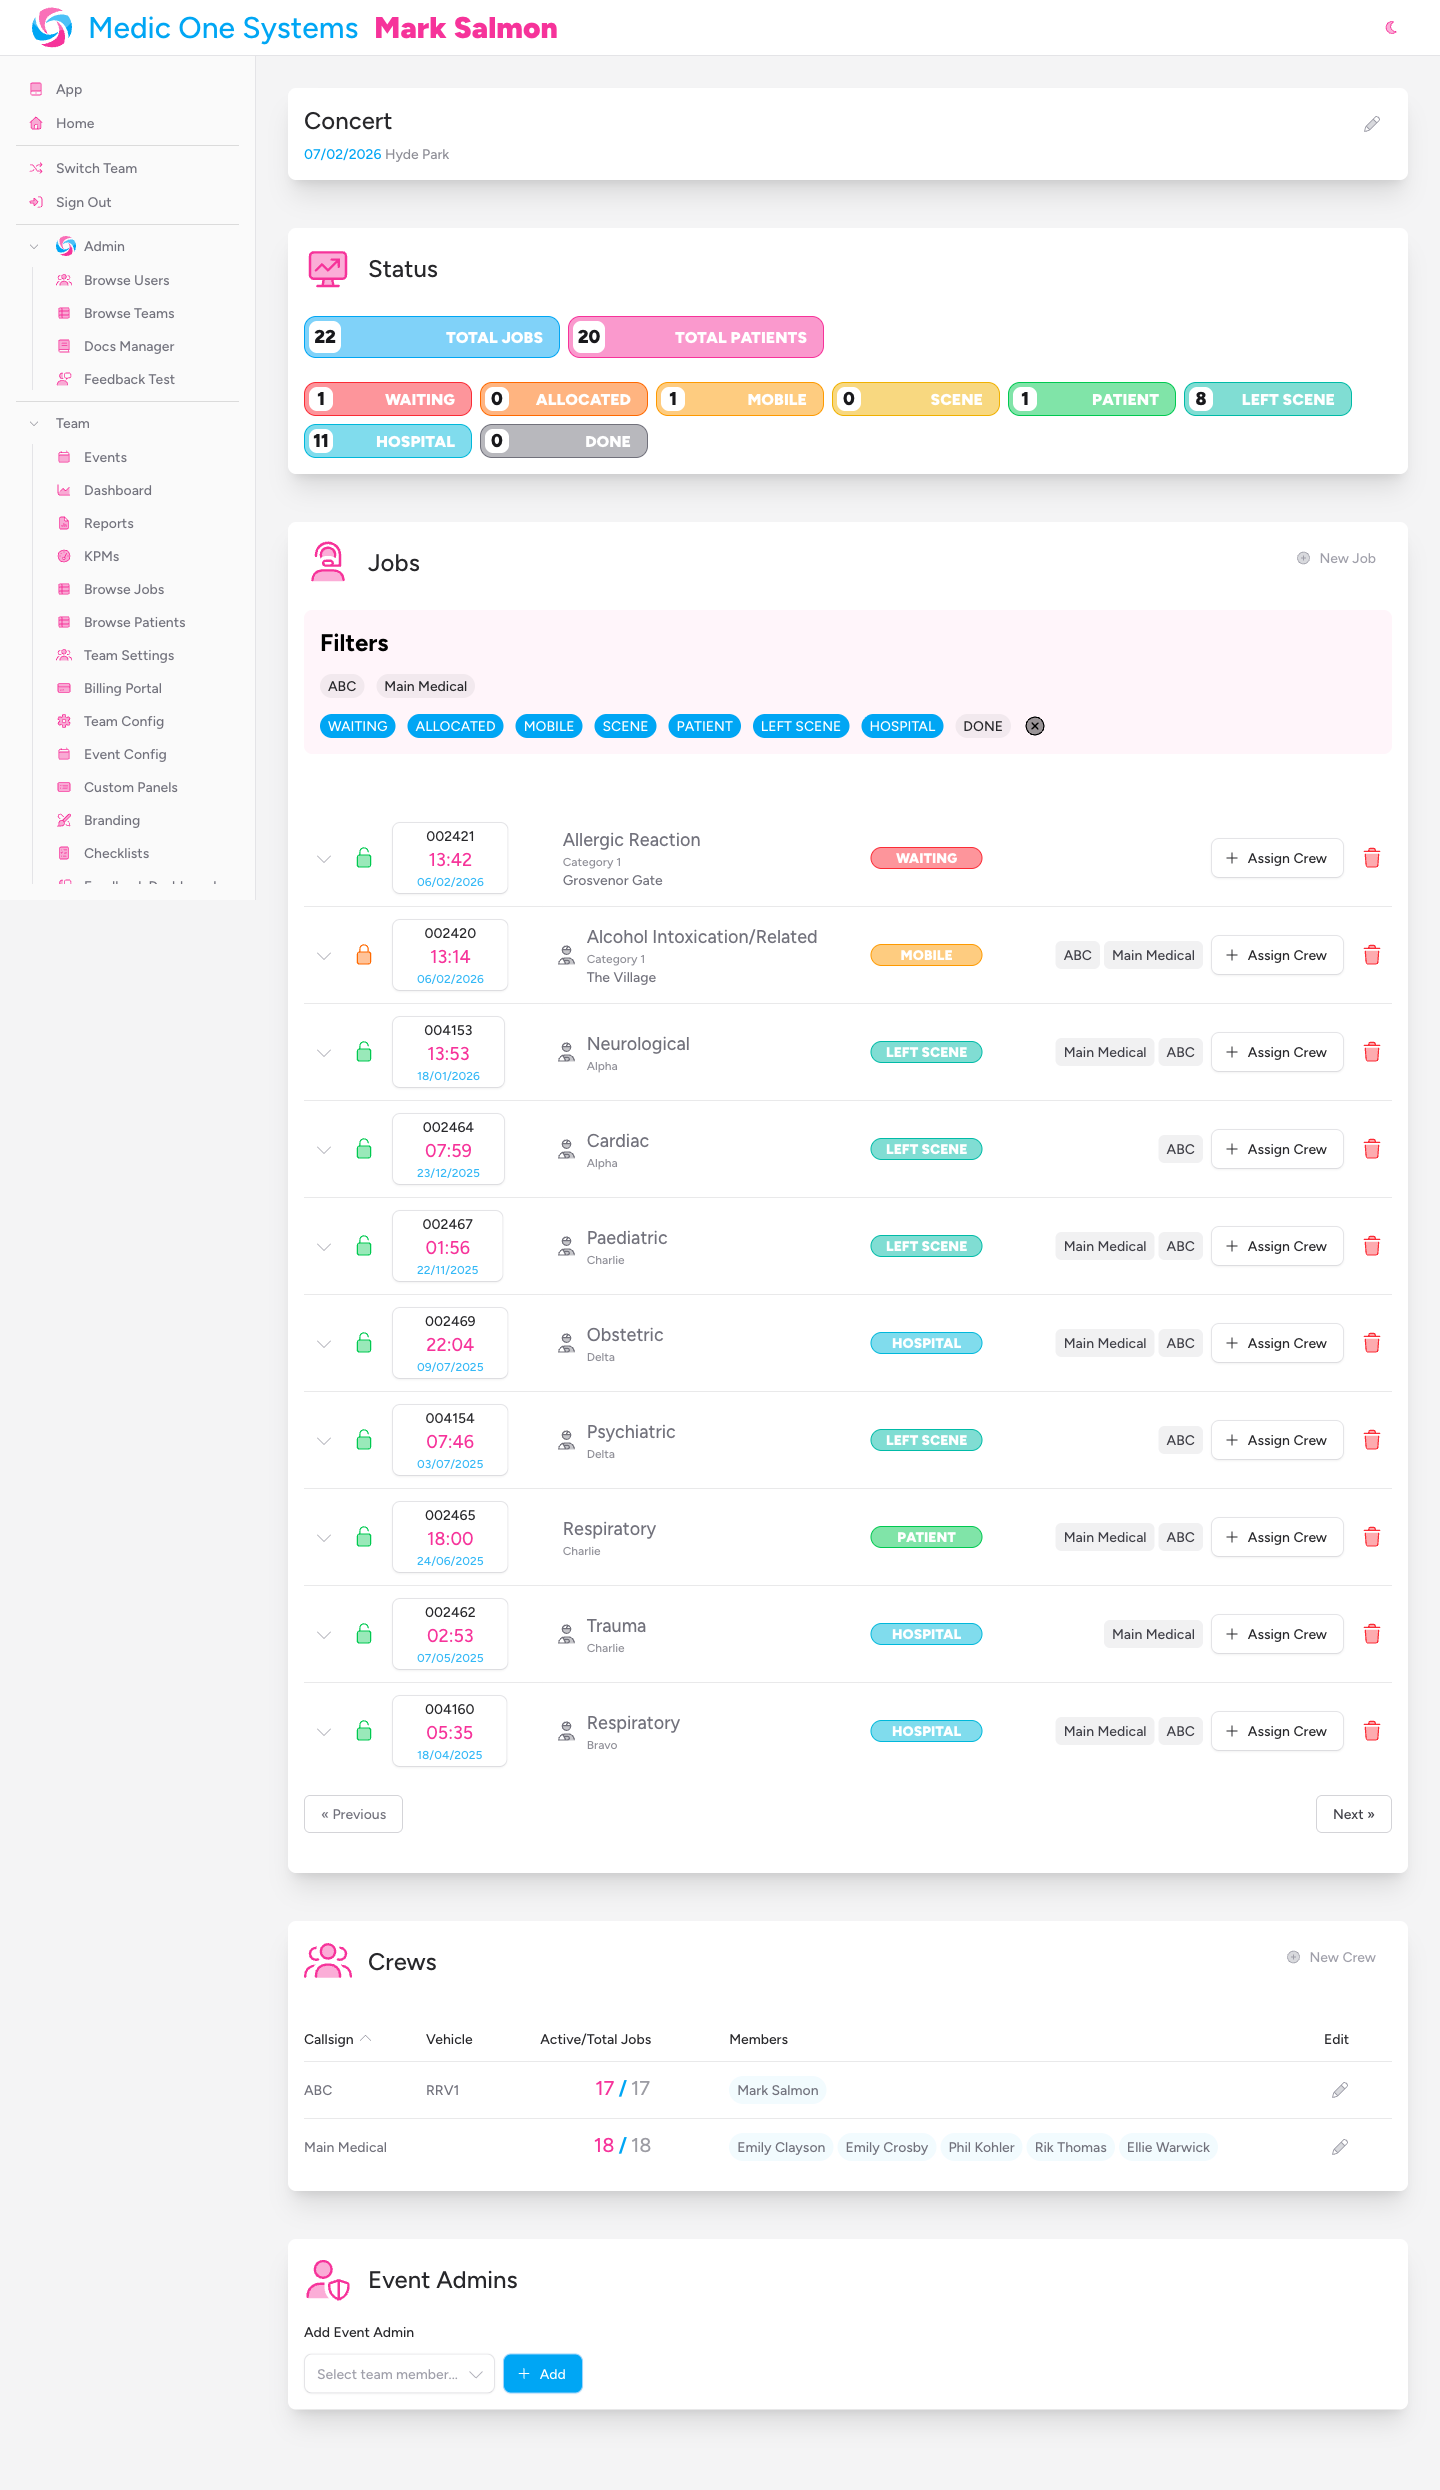
The event page covers everything you do with an event outside of live operations: editing its core details, managing shifts, granting event admin access, sharing an external dashboard, reviewing linked media, and auditing what happened afterwards.
For running jobs and crews while an event is live, use the Control Room — a separate, full-screen operations view launched from this page. See The Control Room for that side of things.
Only team admins and event admins can access this page at all. There is no read-only view for team members.
Before You Start
- You need to be a team administrator or an event administrator for this event.
- If you're setting up a brand-new event, see Setting Up a New Event first — this page assumes the event already exists.
The Event Header
At the top of the page, the header shows the event's title, date, and venue or location.
If you're a team admin or event admin, a pencil icon appears beside the title. Click it to switch the header into edit mode.

Editing event details
Click the pencil icon to reveal the editable fields:
| Field | Description |
|---|---|
| Date | The date of the event |
| Title | The event's display name |
| Event Type | Sport, Motorsport, Music, Equestrian, or Other (configurable in Event Config) |
| Series | Attach the event to a series, if your team uses them |
| Venue | Select from your team's configured venues |
| Location | The precise location — set via postcode, latitude/longitude, What3Words reference, or map zoom (hidden once a venue is selected) |
If you select a venue, job locations within the event can use the venue's pre-configured location points instead of free text. This keeps location data consistent across every job at the same site.
Click Save Event to exit edit mode and save your changes.

Opening the Control Room
A Control Room button sits at the top of the page, beside the pencil icon, for anyone with access. Click it to jump straight into live operations for this event. See The Control Room for what's inside.
Operations Summary
Just below the header, a summary card gives you a running total for the event: Crews, Jobs, Patients, Active Crews, and Hospital. It's a snapshot rather than a live feed — for real-time figures while an event is running, use the Control Room's KPI strip instead.
Shifts
The Shifts section lets you break an event into time-bounded periods — useful for multi-day events or events with a day/night handover.
This section only appears if the event already has more than one shift, or if you have permission to manage the event (so you can add the first one).
Adding a shift
Click Add Shift. A new shift is created starting where the last one ended (or at the start of the event, if there isn't one yet), running for 12 hours. Click the shift's tab, then use its ⋮ Shift actions menu to rename it and adjust its start and end times.
Editing a shift
Select the shift, open its ⋮ Shift actions menu, and choose Edit Shift. Update the Name, Starts at, and Ends at fields, then click Save. The end time must be after the start time.
Deleting a shift
From the same ⋮ Shift actions menu, choose Delete Shift. You'll be asked to confirm — this cannot be undone.
Copying crews from the previous shift
When you select a shift that has an earlier shift with active crews and no crews of its own yet, a Copy crews from previous shift button appears. Click it to duplicate every active crew from the previous shift — callsign, vehicle, venue location, and target headcount — into the current one. This doesn't copy crew members; you'll still need to assign people to each copied crew.
Earlier empty shifts
If an event builds up a run of past, empty shifts, they collapse behind a Show N earlier empty shifts button to keep the shift tab bar manageable. Click it to reveal them.

Event Admins (Team Admins Only)
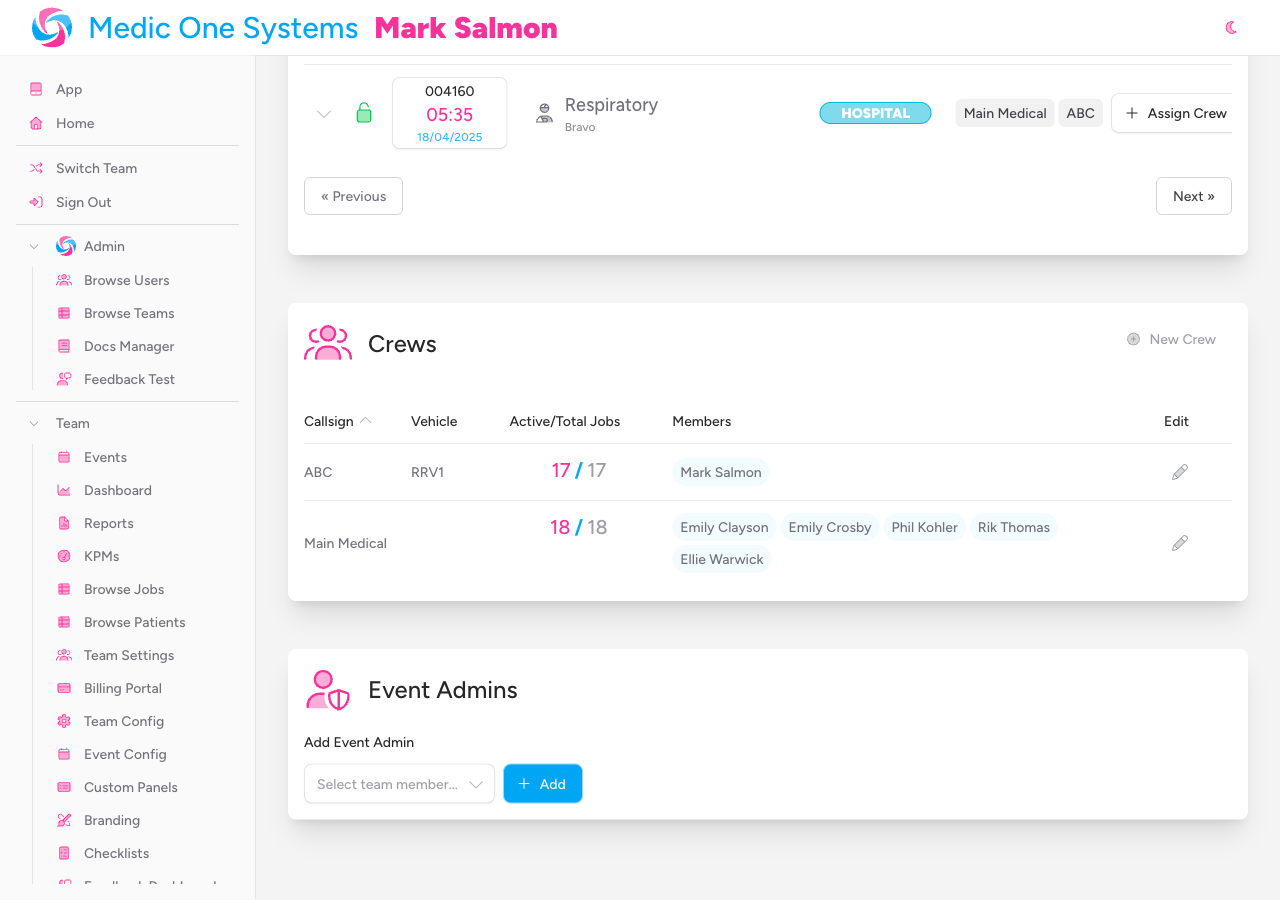
The Event Admins section is only visible to team administrators. It lets you grant elevated access for this specific event to team members who aren't full team admins.
Event admins get the same Control Room access as team admins for this event — they can create and close jobs, manage crews, add notes, and use the merge tool — but they cannot manage the Event Admins section itself, delete the event, or move a job to another event.
Adding an event admin
- Use the searchable select dropdown to find a team member. Only members who aren't already event admins for this event are shown.
- Select the member.
- Click Add.
The member appears as a pill badge in the event admins list.
Removing an event admin
Click the × remove button on any event admin pill badge to revoke their access. This does not affect their role on the team.
External Dashboard
Team admins can share a read-only, live dashboard view of the event with people who don't have an IndieBase login — external agencies, venue management, or an event control room that isn't using IndieBase directly.
Not available for system (Daily Ops) events.
Activating the dashboard
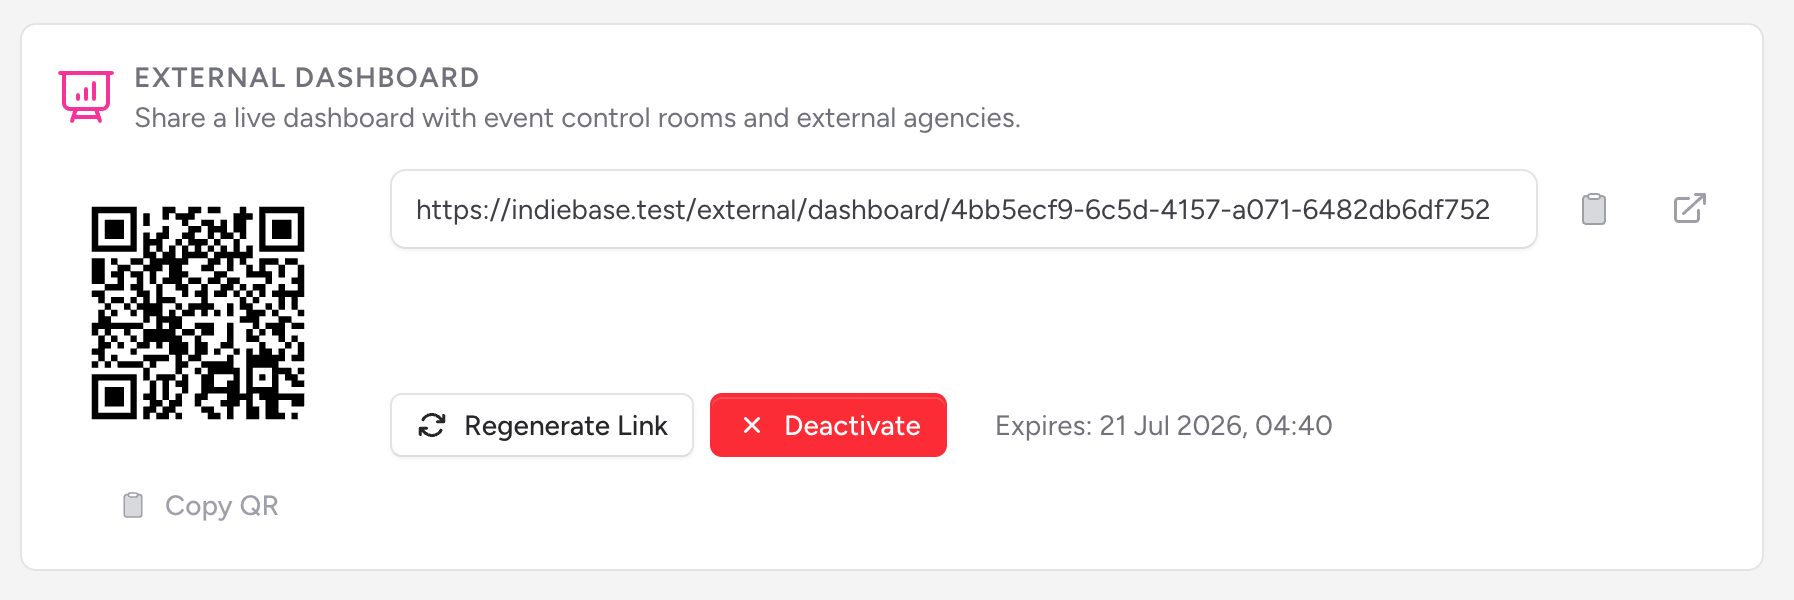
Click Activate Dashboard. A shareable link and QR code are generated immediately.
Once active, the section shows:
- A QR code you can scan directly, with a Copy QR button to copy it as an image
- The dashboard URL, with buttons to copy the link or open it in a new tab
- The link's expiry date
Regenerating or deactivating
- Regenerate Link invalidates the current link and QR code and issues a new one — use this if a link has been shared too widely.
- Deactivate switches the dashboard off entirely. Both actions ask for confirmation first.
Incidents (Read-Only)
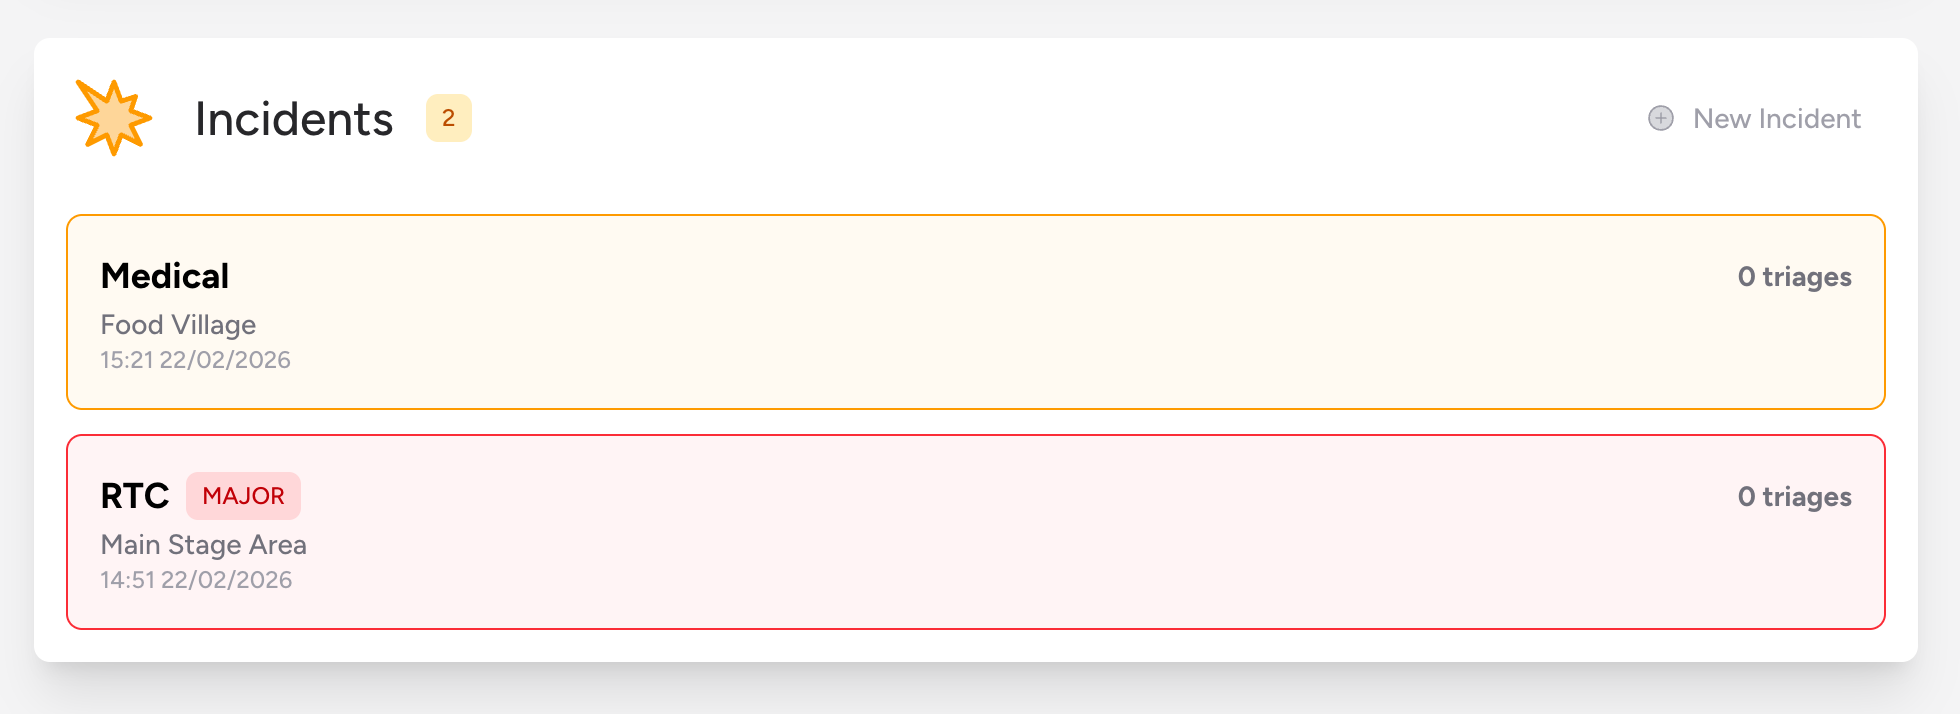
The Incidents section shows every open M/ETHANE incident record attached to this event, refreshing automatically. An amber badge next to the heading shows the count.
This is a read-only summary — to raise or manage an incident while the event is live, use the New M/ETHANE button and incident banner in the Control Room. Clicking an incident card here still takes you to its full record.
Incident cards
Each card shows:
- Type — the incident type (shown as "M/ETHANE" if no type has been set yet)
- Location — the incident location ("Location TBC" if not yet set)
- Date and time — when the incident was called
- Crew badges — any crews assigned to the incident
- Triage count — the number of triage records attached to the incident
Incidents declared as major are highlighted with a red border and a MAJOR badge. All other incidents use amber. Team admins can delete an incident directly from its card.
If there are no open incidents, the section shows a No active incidents placeholder.
Event Media
Team admins can review and manage media (photos, PDFs, and similar) linked to the event from the Event Media section near the bottom of the page. This is the same set of files available from the Control Room's Documents button while the event is live.
Audit Timeline
Team admins and event admins can review a full chronological Audit Timeline for the event — every job, crew, and patient change logged against it. It loads lazily as you scroll, so it stays fast even on long-running events.
Move to Event (System Events Only)
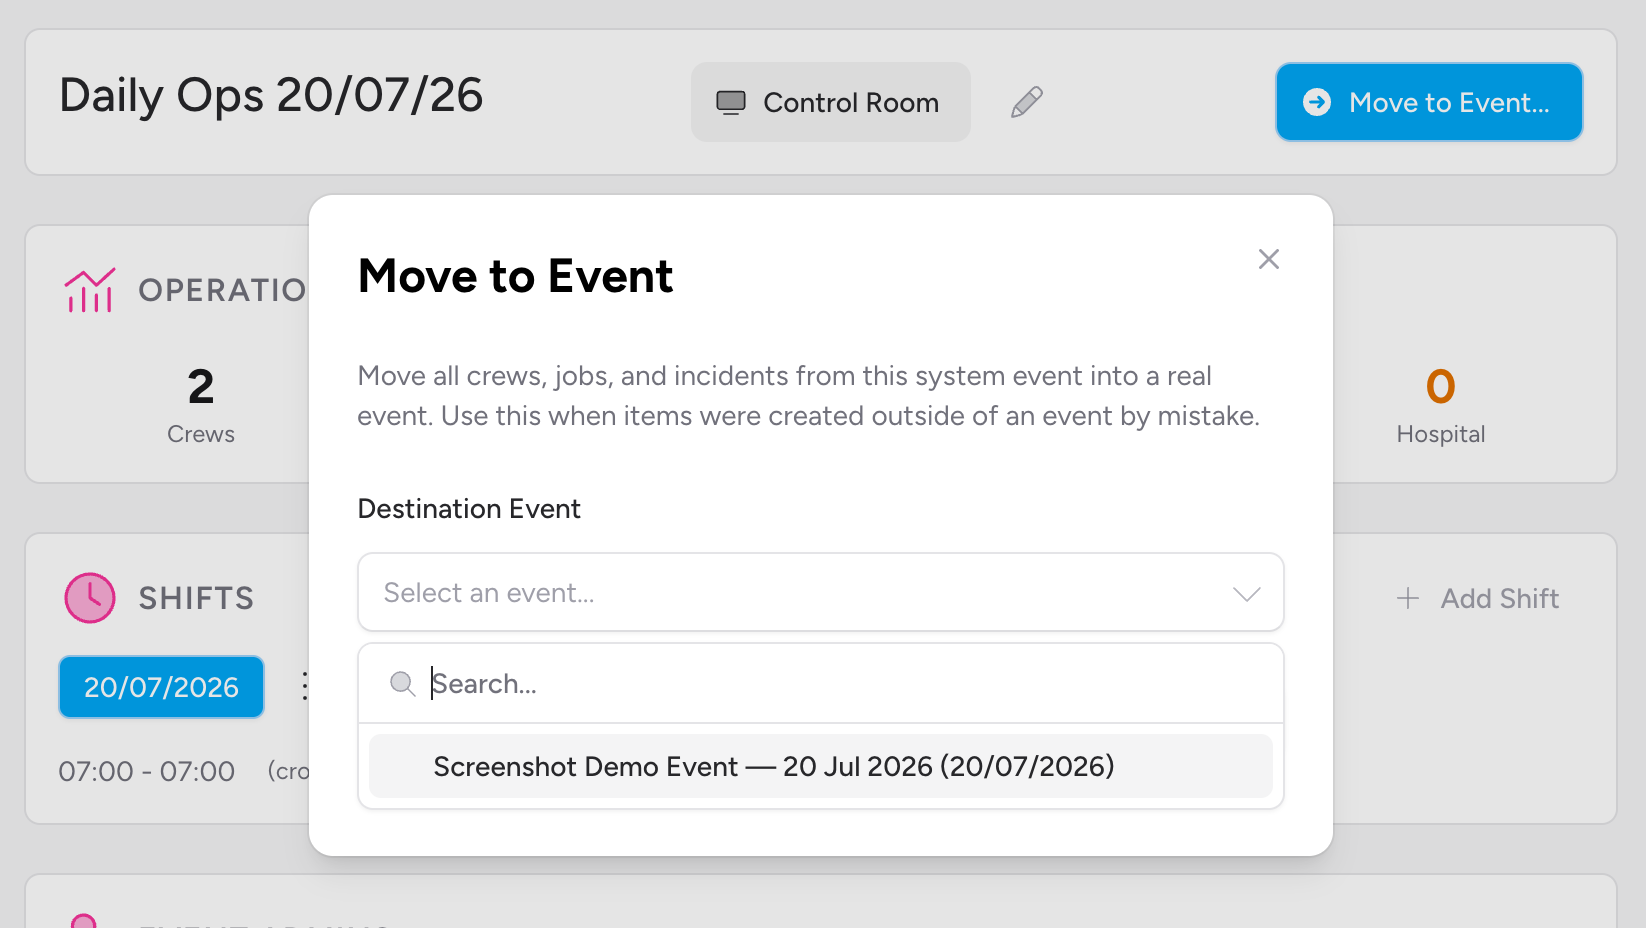
Daily Ops sometimes creates a system event to hold jobs and crews raised outside of any real event. If this has happened, a Move to Event… button appears at the top of the page for team admins (only shown once the system event has crews attached).
- Click Move to Event….
- Choose a Destination Event from the dropdown.
- Click Preview to see exactly what will move — a list of crews, plus total job and incident counts.
- Review the preview, then click Move Everything to confirm.
The system event is deleted automatically once it's empty. This action is permanent.
Role-Based Access
| Action | Team Admin | Event Admin |
|---|---|---|
| View the event page | Yes | Yes |
| Edit event details | Yes | Yes |
| Open the Control Room | Yes | Yes |
| Add, edit, and delete shifts | Yes | Yes |
| Copy crews from a previous shift | Yes | Yes |
| Manage event admins | Yes | No |
| Activate / regenerate / deactivate external dashboard | Yes | No |
| View incidents | Yes | Yes |
| Delete incidents | Yes | No |
| Manage event media | Yes | No |
| View the audit timeline | Yes | Yes |
| Move to Event (absorb a system event) | Yes | No |
| Delete the event | Yes | No |
Team members without event admin access cannot open this page at all. If you need access, ask a team admin to add you as an event admin.
Tips and Best Practices
- Set up shifts before the event starts. The Control Room's crew board and job feed are shift-aware — having your shifts in place ahead of time keeps live dispatch clean.
- Use Copy crews from previous shift for overnight handovers. It saves rebuilding a crew list from scratch for a night shift that mirrors the day shift.
- Grant event admin access sparingly. Event admins get full Control Room access for the duration of the event — only grant it to people who genuinely need it.
- Regenerate the external dashboard link if it's been shared too widely. The old link stops working immediately once you do.
- The Audit Timeline is your source of truth after the fact. If a question comes up about who changed what during an event, it's all there.
Troubleshooting
I can't see the event page at all. You need to be a team admin or event admin for this event. Ask a team admin to check your role or add you as an event admin.
I can't see the Control Room button. Control Room access uses the same admin requirement as this page — if you can see this page, you should see the button. If it's still missing, check with a team admin that your event admin access hasn't been removed.
The Event Admins section is not visible. The Event Admins section is only shown to team administrators. Event admins cannot see or manage this section.
The Move to Event button isn't showing. It only appears on system (Daily Ops) events that already have crews attached, and only for team admins.
I regenerated the dashboard link and now the old one doesn't work. That's expected — regenerating immediately invalidates the previous link and QR code. Share the new one instead.
A shift I deleted had crews or jobs attached. Deleting a shift doesn't delete its crews or jobs — check the Control Room's shift selector or the audit timeline if something looks like it's gone missing.
- The Control Room — live dispatch, crew management, and job close-out for this event
- Merging Duplicate Jobs — combining duplicate job records from the Control Room
- Setting Up a New Event
- Deployment Plans — reusable crew layouts you can apply from the Control Room's Crew Builder