 IndieBase

Table of Contents
The Control Room
The live-operations screen for a running event — dispatch crews, track jobs, close out patients, and keep the whole team on the same picture in real time.
The Control Room
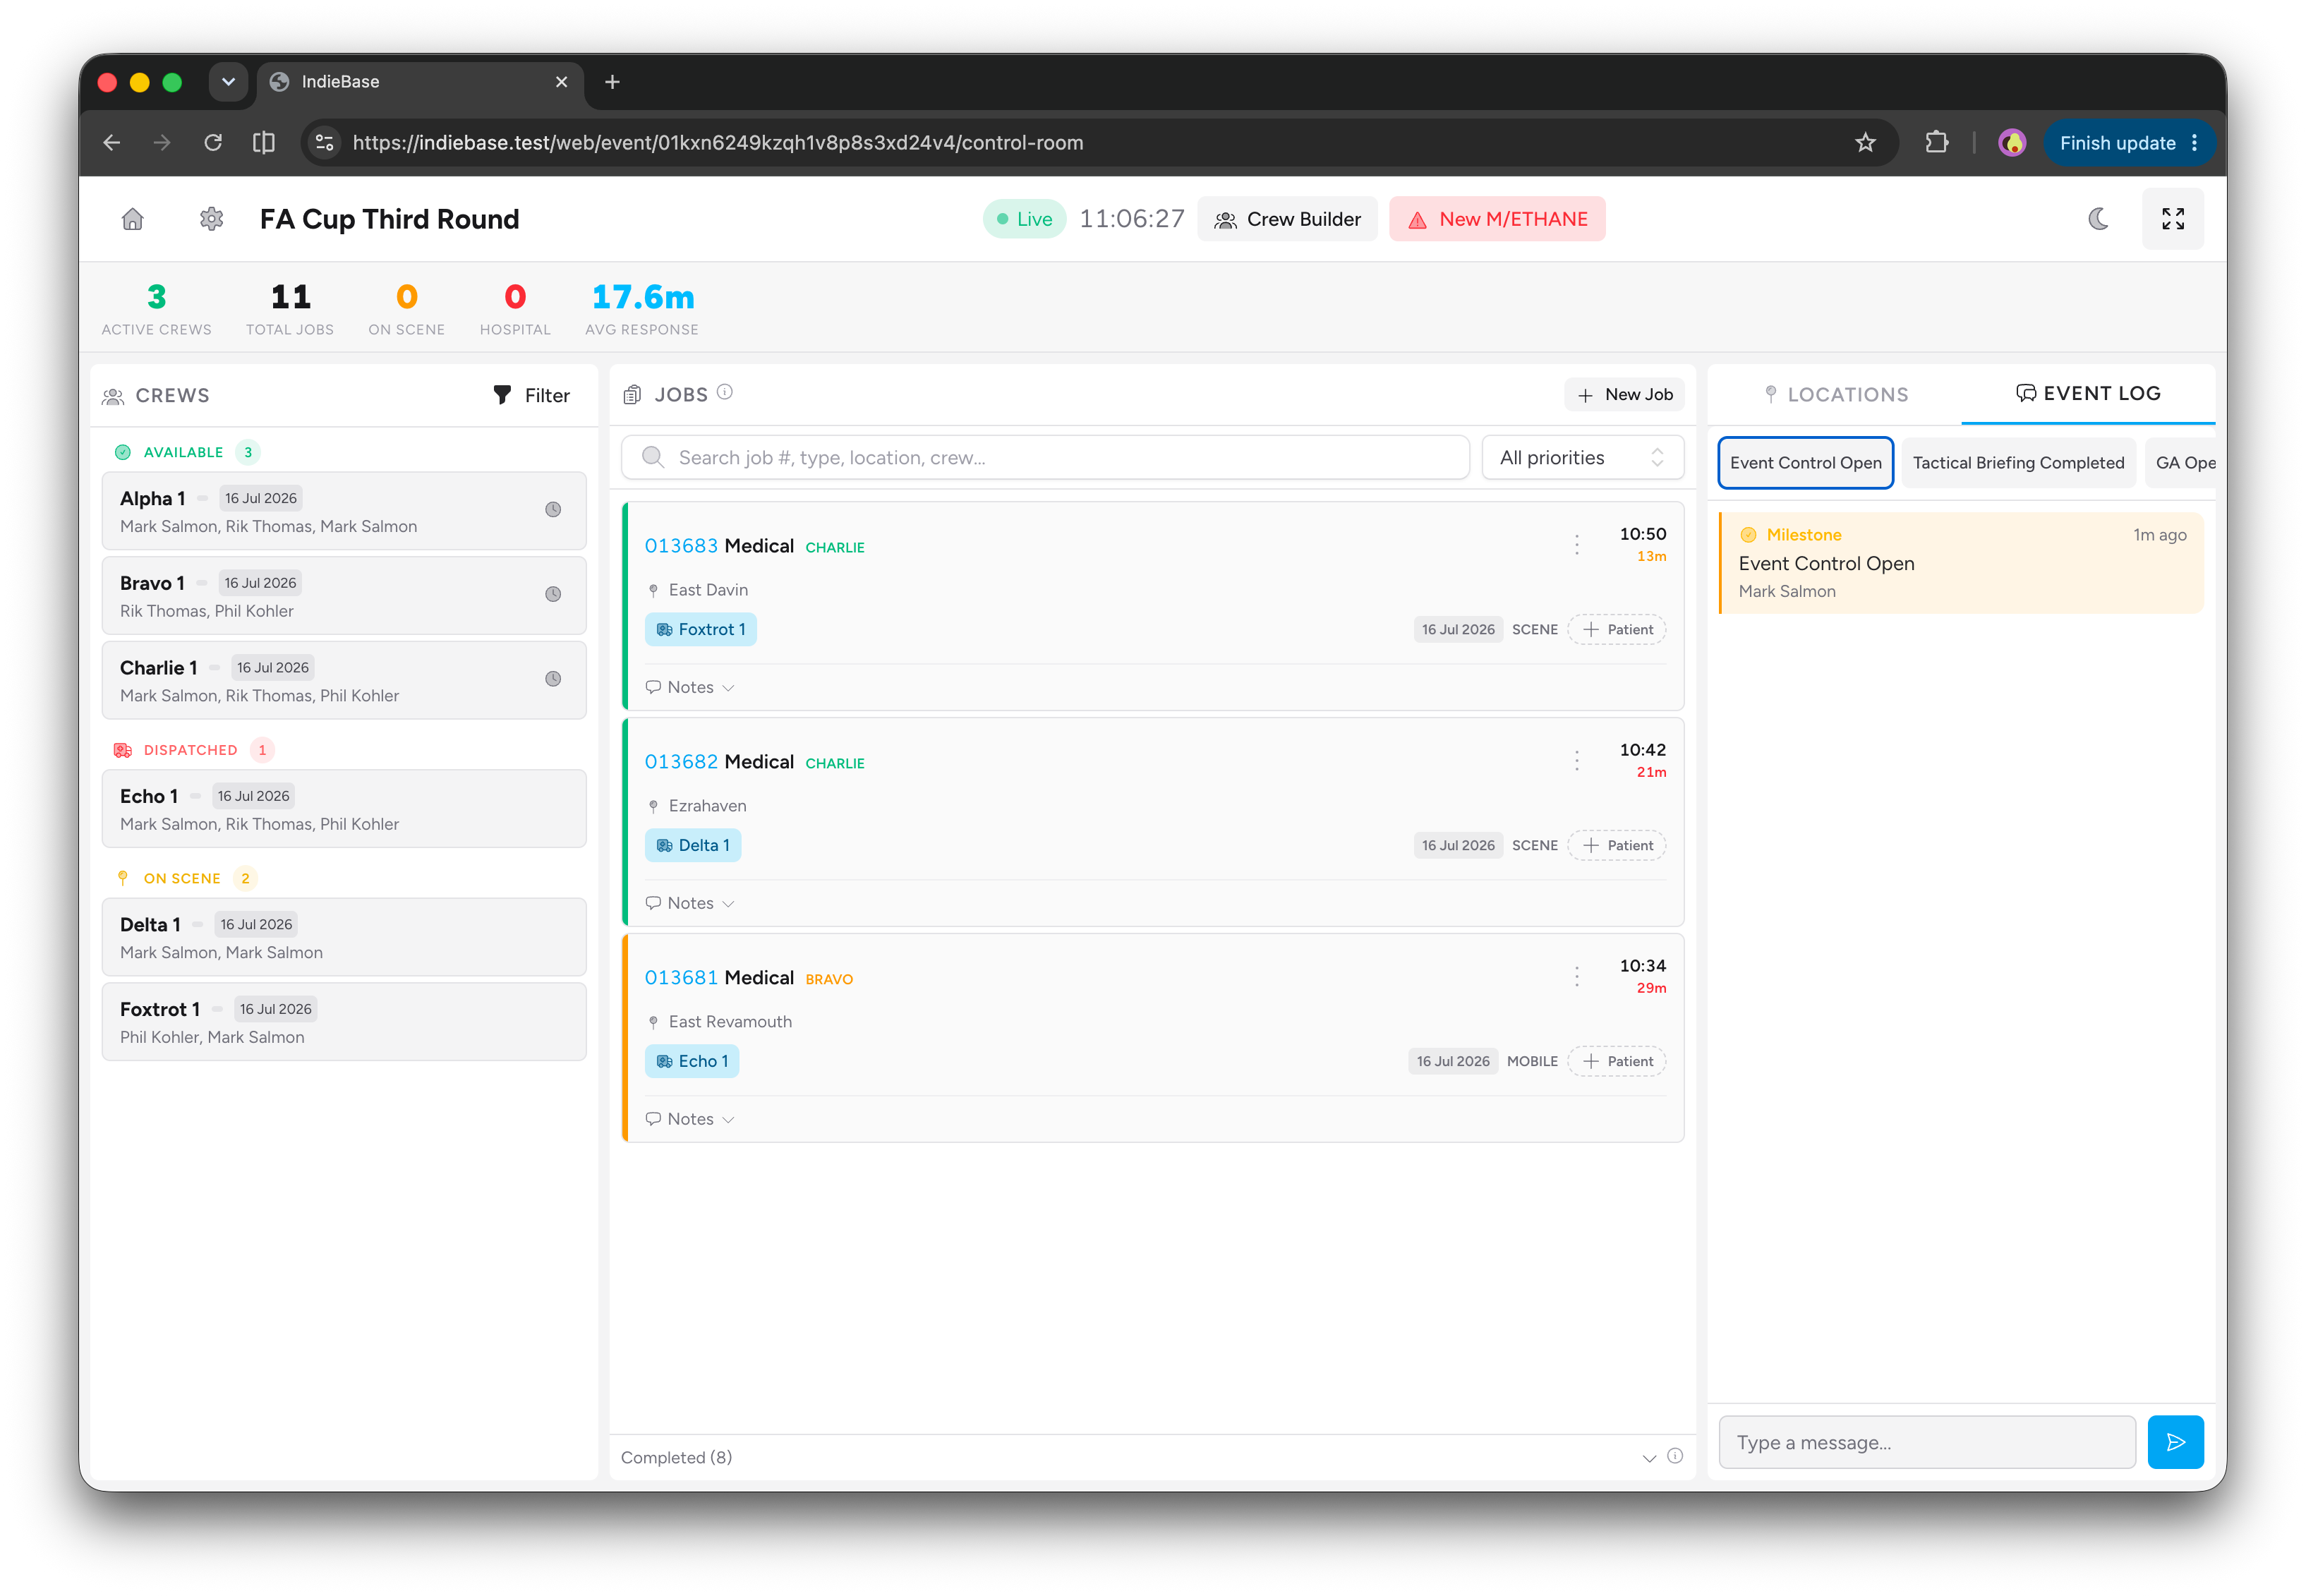
The Control Room is where you run a live event — a full-screen, real-time dispatch board for crews, jobs, and patients, built for the desk during an incident rather than for setup beforehand.
Overview
While the event page is where you configure an event, the Control Room is where you work it. It's a dedicated full-screen view built around three things happening at once: crews moving through their shift, jobs being created and closed, and a shared log of what's happening on the ground.
Everything on the page updates live over a WebSocket connection — a new job created by a colleague, a crew being dispatched, a note posted to the event log — so everyone looking at the Control Room sees the same picture within a second or two, without needing to refresh.
The Control Room is designed for a big screen at a fixed control desk, but it works on any device. It supports both light and dark themes and a fullscreen mode for dedicated displays.
Before You Start
- You need to be a team administrator or an event administrator for this event to open the Control Room. There is no read-only view for team members — the Control Room is an admin tool.
- The event needs at least one shift set up (from the Managing an Event page) before you can dispatch crews or create jobs against it.
- Set up your crews before the event starts. You can add and assign crews directly from the Control Room's Crew Builder, but it's faster to walk into a live event with your crews already in place.
Opening the Control Room
Click the Control Room button at the top of the event page, or navigate directly to /event/{event}/control-room. The event page remains available separately for setup, shift management, and event admin — the Control Room is purely for live running.
Access is admin-only. If you can't see the Control Room button, you don't have team admin or event admin access for this event. Ask a team admin to grant you event admin access from the Managing an Event page.
The Header
Across the top of the screen:
- Home and Settings (cog) icons — the cog takes you back to the event's setup page.
- Event title, venue, and series badge (if the event belongs to a series).
- Shift name — shown only when the event has more than one shift.
- Live / Offline badge — a green pulsing Live badge shows the WebSocket connection is active. If it drops, the badge turns red and reads Offline, and a banner appears below the header: amber Reconnecting… while the connection retries, or red Disconnected — using cached data if it can't reconnect. The Control Room keeps working from its last-known data while disconnected.
- Clock — the current time, ticking live.
- Shift selector — a dropdown to switch which shift's crews and jobs you're viewing, including an All shifts option. Only shown when the event has more than one shift.
- Crew Builder button — opens the Crew Builder slideover.
- New M/ETHANE button — raises a major incident record scoped to this event and the currently selected shift.
- Documents button — only shown if the event has linked media; opens the Documents list.
- Theme toggle (sun/moon) and Fullscreen toggle — switch appearance and enter/exit fullscreen mode for a dedicated display.

The KPI Strip
Below the header, a row of headline stats gives you an at-a-glance read on the event:
| Stat | What it shows |
|---|---|
| Active Crews | Crews currently dispatched, on scene, or with a patient |
| Total Jobs | Total jobs logged for the current shift/event view |
| On Scene | Jobs where a crew has reached the scene |
| Hospital | Jobs where the patient has arrived at hospital |
| Avg Response | Average time from dispatch to on-scene, in minutes (hidden if there's no data yet) |
| Screening +ve | Positive screening results and how many are still awaiting completion — only shown for teams with screening enabled on a series event |

Shift Comparison
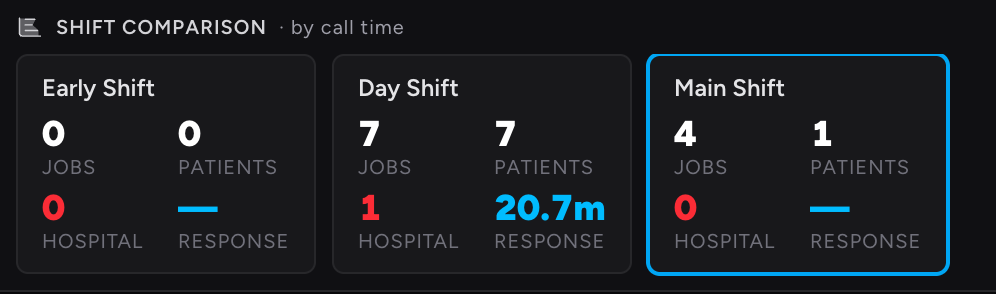
If the event has more than one shift, a collapsible Shift Comparison panel sits just below the KPI strip. It shows a small card per shift with Jobs, Patients, Hospital, and Response figures side by side, so you can see how the current shift compares to others. Click a shift's card to switch the whole Control Room to that shift. Totals are counted by call time, so every job is counted once, in the shift its call actually came in.
The Crew Board
The left-hand panel shows every crew on the current shift, grouped into lanes.
Status vs Type view
A toggle at the top of the panel switches how crews are grouped:
- Status (default) — lanes are Available, Dispatched, On Scene, With Patient, Hospital, Break, Off Duty, and Uncrewed.
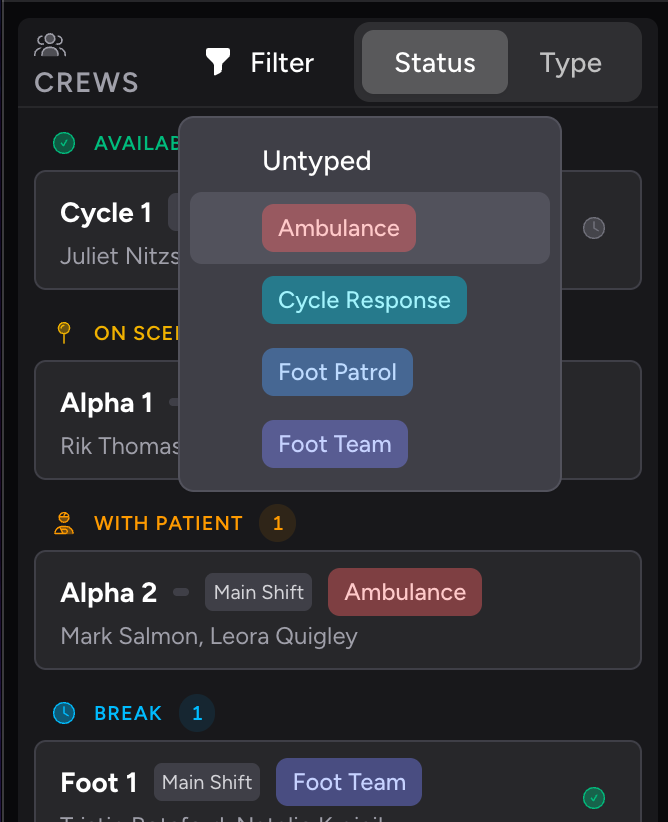
- Type — lanes become your team's configured crew types, with an Untyped lane last. Only shown if your team has crew types configured.
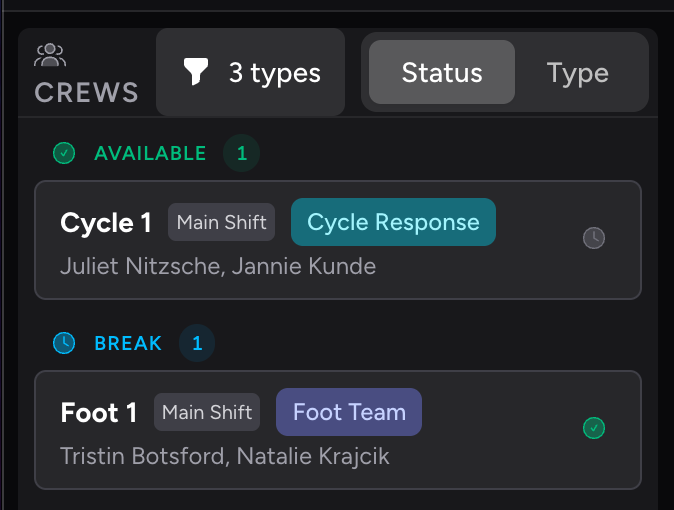
A funnel button above the board opens a checkbox menu to filter the board down to specific crew types (plus an Untyped option). Selecting more than one type shows crews matching any of them. A Clear filter option appears once a filter is active. This filter is shared with the job feed, so filtering the crew board also filters which jobs are shown.
Crew cards
Each card shows the crew's callsign, vehicle, a badge for the shift it belongs to (highlighted amber if it's not the shift you're currently viewing), a crew type badge if set, its members, and a device battery/connection indicator if the crew is using a managed device. Cards flag understaffed or empty crews with a warning row.
Click a selectable card to select that crew — it highlights with a ring. A selected crew can then be assigned to a job from the job feed (see Dispatching a Crew below). Uncrewed cards can't be selected.
Break and off duty
Small icon buttons on a card let you take a crew off the active roster without removing them from the event:
- From Available, click the clock icon to set a break (the crew moves to the Break lane for 30 minutes).
- From Break, click the check-circle icon to end the break early.
- From Off Duty, click the check-circle icon to return the crew to duty.
The Job Feed
The centre panel is the live job feed — every job on the current shift (plus unassigned jobs, which appear under every shift).
Filtering and searching
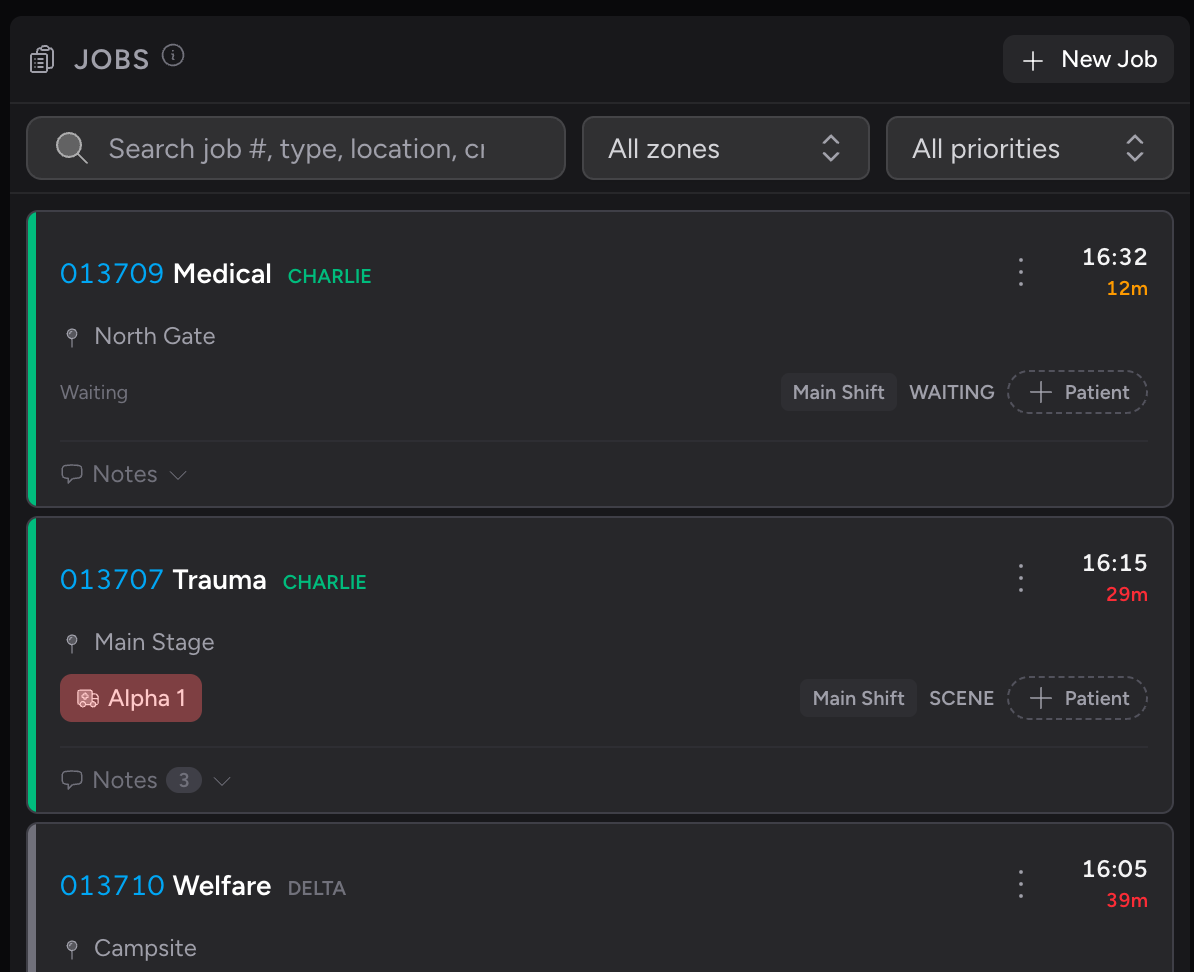
A search bar filters jobs by job number, type, location, or crew as you type. If the event has a venue with locations configured, a zone dropdown and a priority dropdown sit alongside it. A Clear button appears once any filter is active.
Crew Assignment Chips
Just below the search bar, a pair of chips lets you switch between the full feed and the crewless pool:
- All jobs — the ordinary feed, shown by default
- Unassigned · N — an amber chip showing a live count of jobs and incidents with no crew attached. It's shown even when the count is zero, so the pool is always visible.
Click Unassigned · N to narrow both the active and completed feeds down to crewless jobs only — useful after a shift where crew members were allowed to create jobs and incidents before a crew had been allocated to them. If nothing is unassigned, the feed shows "No unassigned jobs — everything has a crew." with a button to switch straight back to All jobs.

Creating a new job
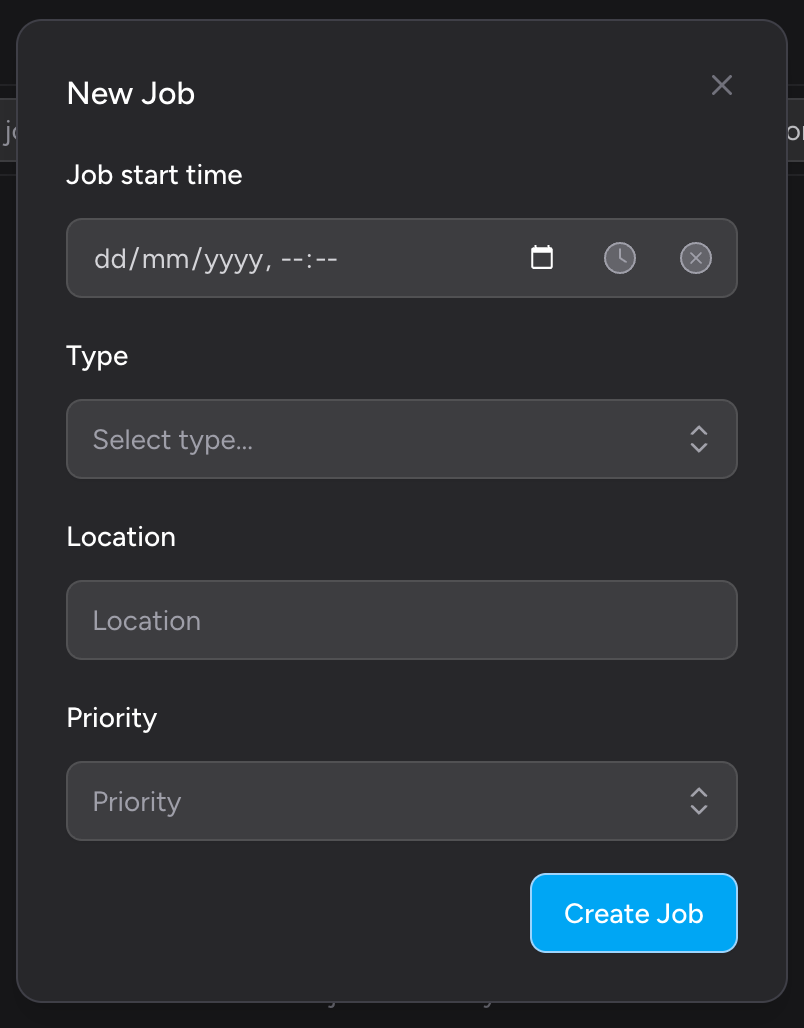
Click New Job at the top of the feed, or press N. Fill in:
| Field | Notes |
|---|---|
| Job start time | The actual call time. Defaults are handled by the date/time picker's buttons |
| Type | From your team's configured job types (required) |
| Location | Free text, or an autocomplete of the event venue's configured locations if one is set |
| Priority | From your team's configured priority levels |
Click Create Job to save. The call time must be within about 5 minutes of now (to catch clock-skew errors), no more than a year in the past, and inside the currently-viewed shift's time window if a specific shift is selected.
Job cards
Each active job card shows:
- Job number, type, and priority — with a coloured bar down the left edge indicating urgency
- Call time and elapsed time — a running timer since the call came in, turning amber after 10 minutes and red after 20
- Location
- Crew badges — one per assigned crew, or an amber Unassigned pill if none is assigned yet
- Status — a small uppercase label (e.g. WAITING, ALLOCATED, SCENE), derived automatically from crew and patient timestamps
- Patient badge — see The Patient Badge below
- Notes — a collapsible section with a count badge (see Notes on a Job)
Dispatching a crew to a job
- Select a crew from the Crew Board — click its card, or press a number key 1–9 to select by position.
- An Assign button appears on each job card while a crew is selected. Click it on the job you want to dispatch the crew to.
The crew is attached to the job immediately, its Dispatch time is set to the current time, and a crew badge appears on the card, replacing the amber Unassigned pill if this was the job's first crew. You can dispatch more than one crew to the same job by repeating the same steps for another crew — each one adds its own badge rather than replacing the last. If the crew can't be dispatched — it has no members, or another dispatcher is mid-dispatch with it — an error message appears instead.
Crew timestamps
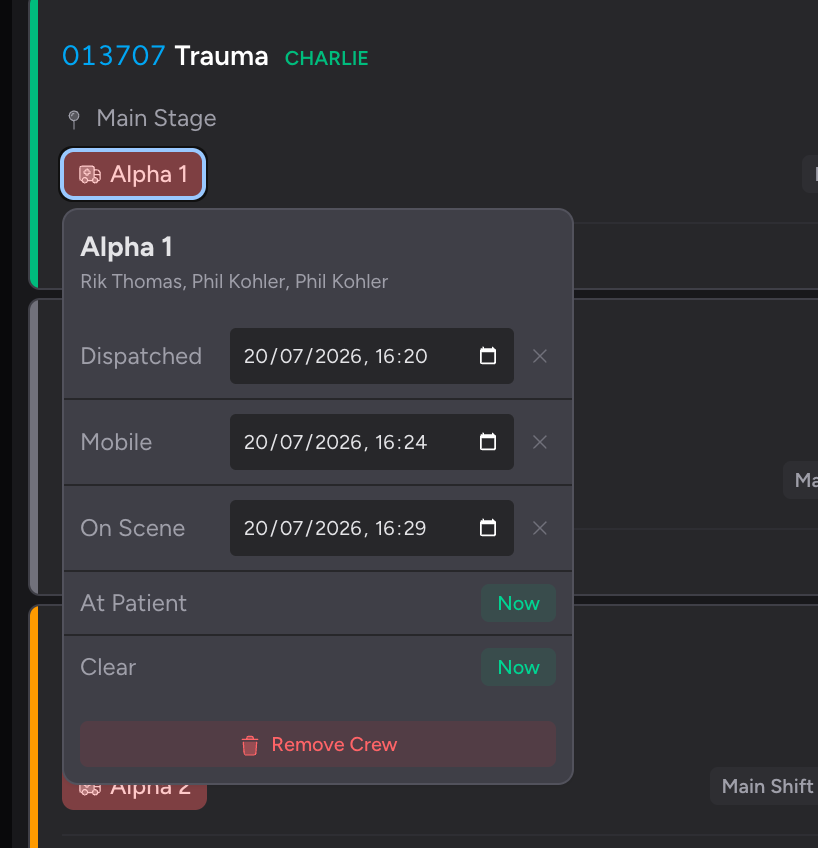
Tap a crew badge on a job card to open a popover with five timestamps: Dispatched, Mobile, On Scene, At Patient, and Clear. Each one shows a Now button if it hasn't been set yet, or a time field with a small clear button if it has. A Remove Crew button at the bottom of the popover detaches the crew from the job entirely — but only before the crew is marked on scene. Once the On Scene time is set, removal is blocked and a message tells you so.
The Patient Badge
- When a patient exists — the badge shows their age and sex when known (for example, 33 years · Male). Tap it to open the patient edit modal.
- When no patient has been added — a dashed + Patient button appears instead. Tap it to add one.
Notes on a job
Click the Notes toggle on a card to expand its note thread. Type into the input and press Enter, or click the send button, to post a note. Notes show the author's name and a relative timestamp. You can delete your own notes; a trash icon appears on hover.
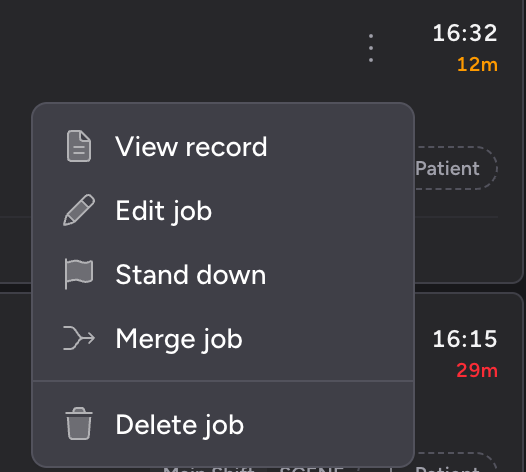
The ⋮ button in the top-right corner of every job card opens a menu:
| Option | When available | What it does |
|---|---|---|
| View record | Always | Opens the full job record in the Job View Slideover |
| Edit job | Always | Opens a modal to update start time, type, location, or priority |
| Mark done | Job has a patient record | Closes the job as complete (see below) |
| Stand down | Job has no patient record | Closes the job without a patient contact (see below) |
| Merge job | You have merge permission | Opens the job merge tool |
| Delete job | Always | Permanently removes the job after a confirmation prompt |
The close-out option is contextual — you will only ever see Mark done or Stand down, never both, and it's re-checked at the moment you confirm in case the job's patient status changed in the meantime.
Closing a Job: Mark Done vs Stand Down
Mark done — shown when the job has a patient record. A confirmation dialogue asks you to confirm the job reference. If required clinical or job fields are still missing, the dialogue lists them and offers an Edit patient button to complete them before closing — or a Delete this job instead escape hatch if the job was raised in error.
Patient feedback questions (post-discharge satisfaction surveys) are collected separately, by email or portal, after the patient has left. They are never part of this required-field check.
Stand down — shown when the job has no patient record. Use it when a crew was dispatched but there was no patient contact — a stood-down-before-scene call, or a hoax. This closes the job without requiring any clinical data.
If another clinician currently has the patient record open, you'll see a warning inside the confirmation dialogue. It won't stop you closing the job, but it's worth a check first.
Completed Jobs
Closed jobs move into a collapsible Completed section at the bottom of the feed, showing a running count. A job that was stood down or completed without ever having a crew still carries its amber Unassigned pill here — closing a job never clears the flag, so crewless work stays visible for retrospective assignment even after it's done. Each completed card has its own ⋮ menu:
- View record — opens the full job record
- Edit job — corrects metadata on a closed job without reopening it
- Re-open job — moves the job back into the active feed, after a confirmation prompt
A Load more button appears if there are more completed jobs than currently shown.
The Job View Slideover
Click View record from a job's actions menu, or click the job card itself, to open the full record in a slideover on the right of the screen. It shows a read-only preview of the patient report and, depending on the job and your permissions, a row of action buttons:
| Button | Availability | What it does |
|---|---|---|
| Move to Event | Team admins | Moves the job — and the crew's other jobs on the same shift — to a different event. Opens a picker with a destination event dropdown and a warning if other jobs will move too |
| Merge job | Merge permission | Opens the job merge tool |
| Edit Patient / Create Patient | Standard update permission | Opens the patient edit modal |
| Send PRF to portal | If your team has the PRF portal enabled | Generates a time-limited shareable link to the patient report |
| Send / Download PRF | If the job has a patient | Emails the report to the hospital and/or the patient, or downloads a copy |
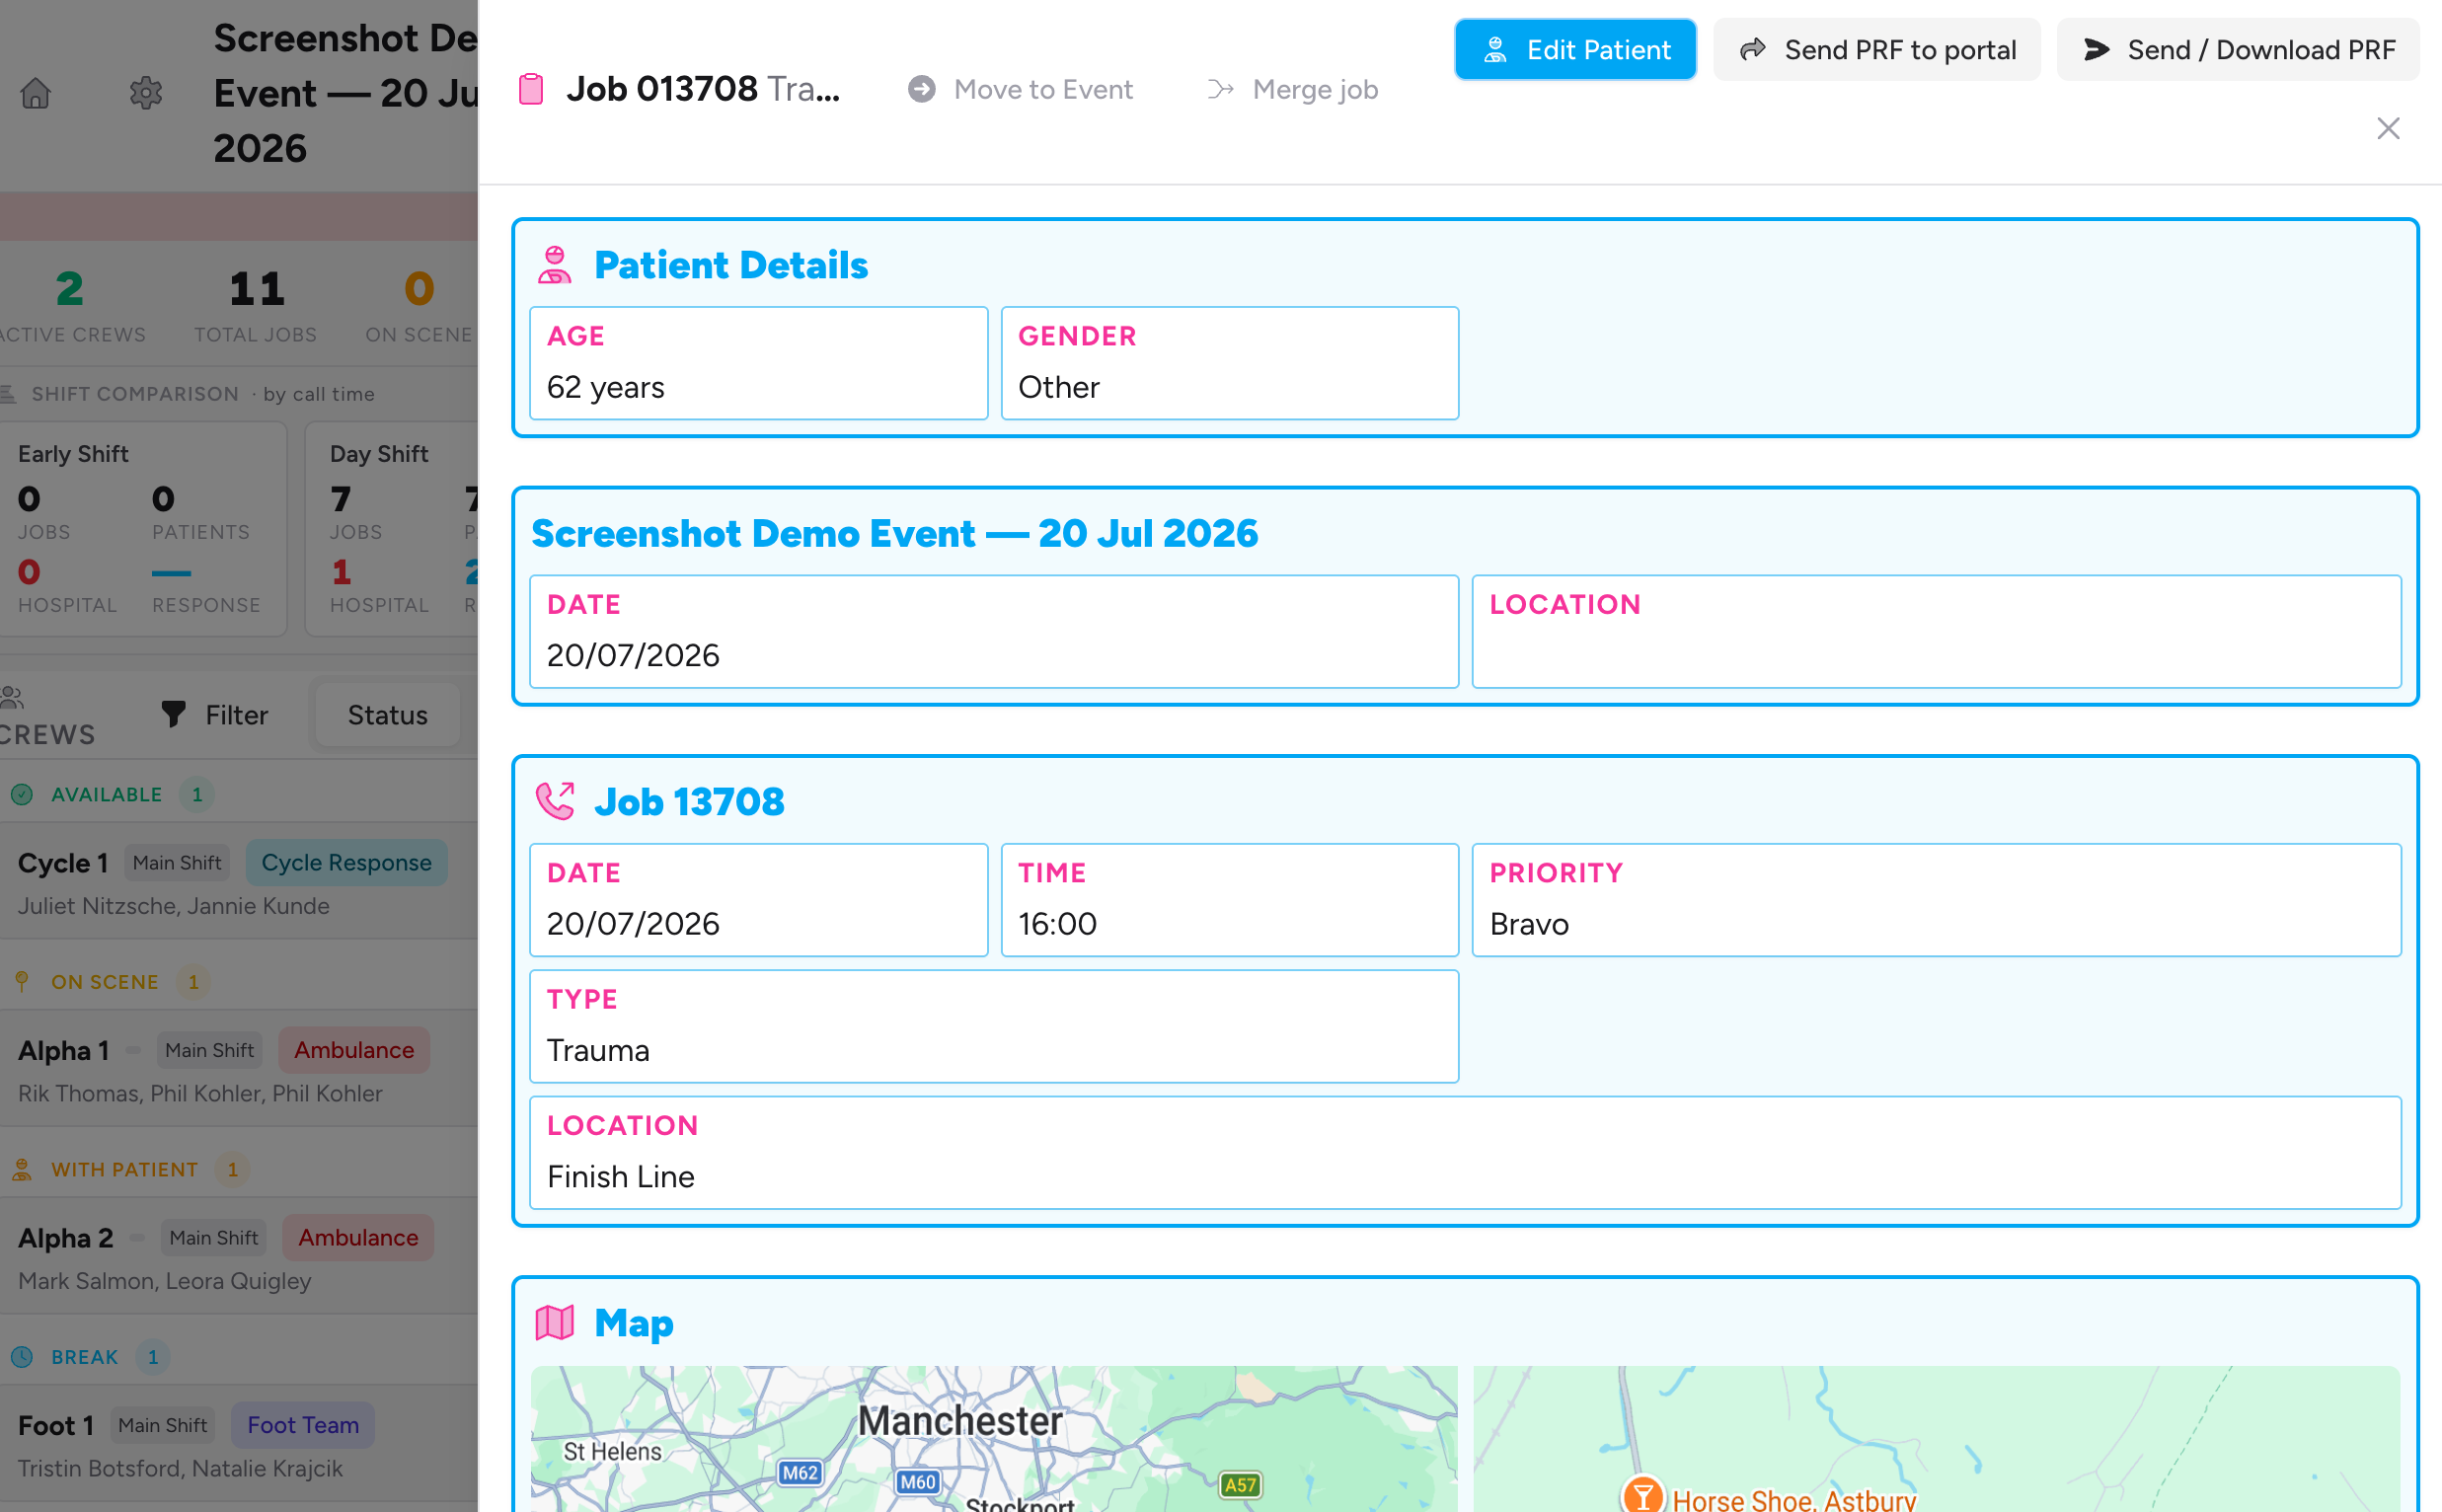
Sending or sharing a PRF
Send / Download PRF opens a modal offering (depending on what your team has enabled and what contact details the patient has): Send to [hospital name], Send to patient, and Download PDF. Each option regenerates the report fresh before sending, so it's never stale. After a successful send to the patient, a one-time password panel appears — share it with the patient, or use the Text to patient button to send it by SMS if they have a phone number on file.
Send PRF to portal creates a time-limited link instead of emailing anything directly. Choose which report to share, then click Create link. The resulting portal link and reference code are shown once — use Copy code or Copy message to grab them before closing. A list of currently active links sits below, each with a Revoke button.
Moving a job to another event
Click Move to Event, choose a destination from the searchable dropdown, and confirm. If the crew has other jobs on the same shift, they move together as a cluster — the modal warns you before you confirm. On success you're taken straight to the destination event's Control Room.
If the event has any open M/ETHANE incidents, a banner appears above the job feed listing each one — type, location, call time, assigned crews, and a triage count. Major incidents are outlined in red with a MAJOR badge; standard incidents are amber. Click an incident to expand it and reveal an Open Full Incident → link, a Mark Done button, and (if you have permission) a delete button.
Raise a new incident at any time with the New M/ETHANE button in the header, or the I keyboard shortcut.
Right Panel: Locations and Event Log
Two tabs share the right-hand panel.
Locations
A list of the event venue's configured locations, showing which crews are currently at each one (or Unoccupied if none are). If the event doesn't have a venue with locations configured, you'll see a prompt to configure them.
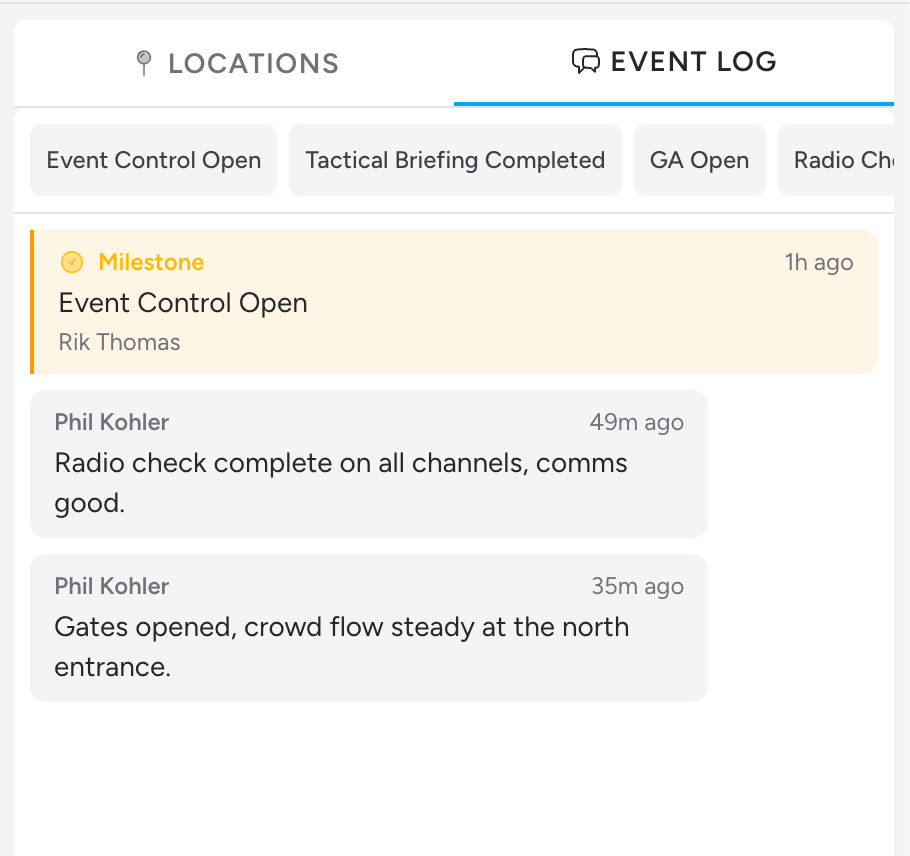
Event Log
A running chat-style feed of notes for the whole event — separate from the notes on individual job cards. Type a message and press Cmd/Ctrl+Enter or click send to post it.
Above the feed, a row of macro buttons — configured per team — let you log a milestone in one click (for example, "Gates Open" or "First Aid Post Established"). Some macros open a small inline form for extra detail (a number, a yes/no toggle, or free text) before logging. Milestone entries appear in the feed with a distinct amber-bordered style and a milestone icon.
You can delete your own notes; other people's are not editable or deletable by you.
The Crew Builder
Click Crew Builder in the header, or press B, to open the slideover for building out your crews without leaving the Control Room.
Adding and removing crews
Enter a callsign and, if your team uses crew types, pick one, then click Add. To remove a crew, click its trash icon and confirm. Removal is blocked if the crew has any jobs or incidents attached — a message tells you how many and why. If the crew is a duplicate, don't delete it: use Merging crews instead, which moves its jobs and members to the surviving crew.
Assigning members
Drag team members between the Available Members pool on the right and a crew's member list on the left using the grip handle. Remove an individual member from a crew with its own × button.
Crew type and shift
Each crew has a ⋮ Crew actions menu (shown when your team has more than one shift, or has crew types configured) with two groups:
- Crew type — pick a type, or No type
- Move to shift — move the crew to a different shift in the same event
Applying a deployment plan
If the event's venue has saved deployment plans, they're listed at the top of the slideover. Click Apply on a plan to populate the current shift with its saved crews, stations, and callsigns.
Saving as a template
Once you've built out your crews for a shift, click Save as Template at the bottom of the slideover, give it a name, and it's saved as a reusable deployment plan for the venue — ready to apply to future events at the same site. This option only appears for events with a venue set.
Merging crews
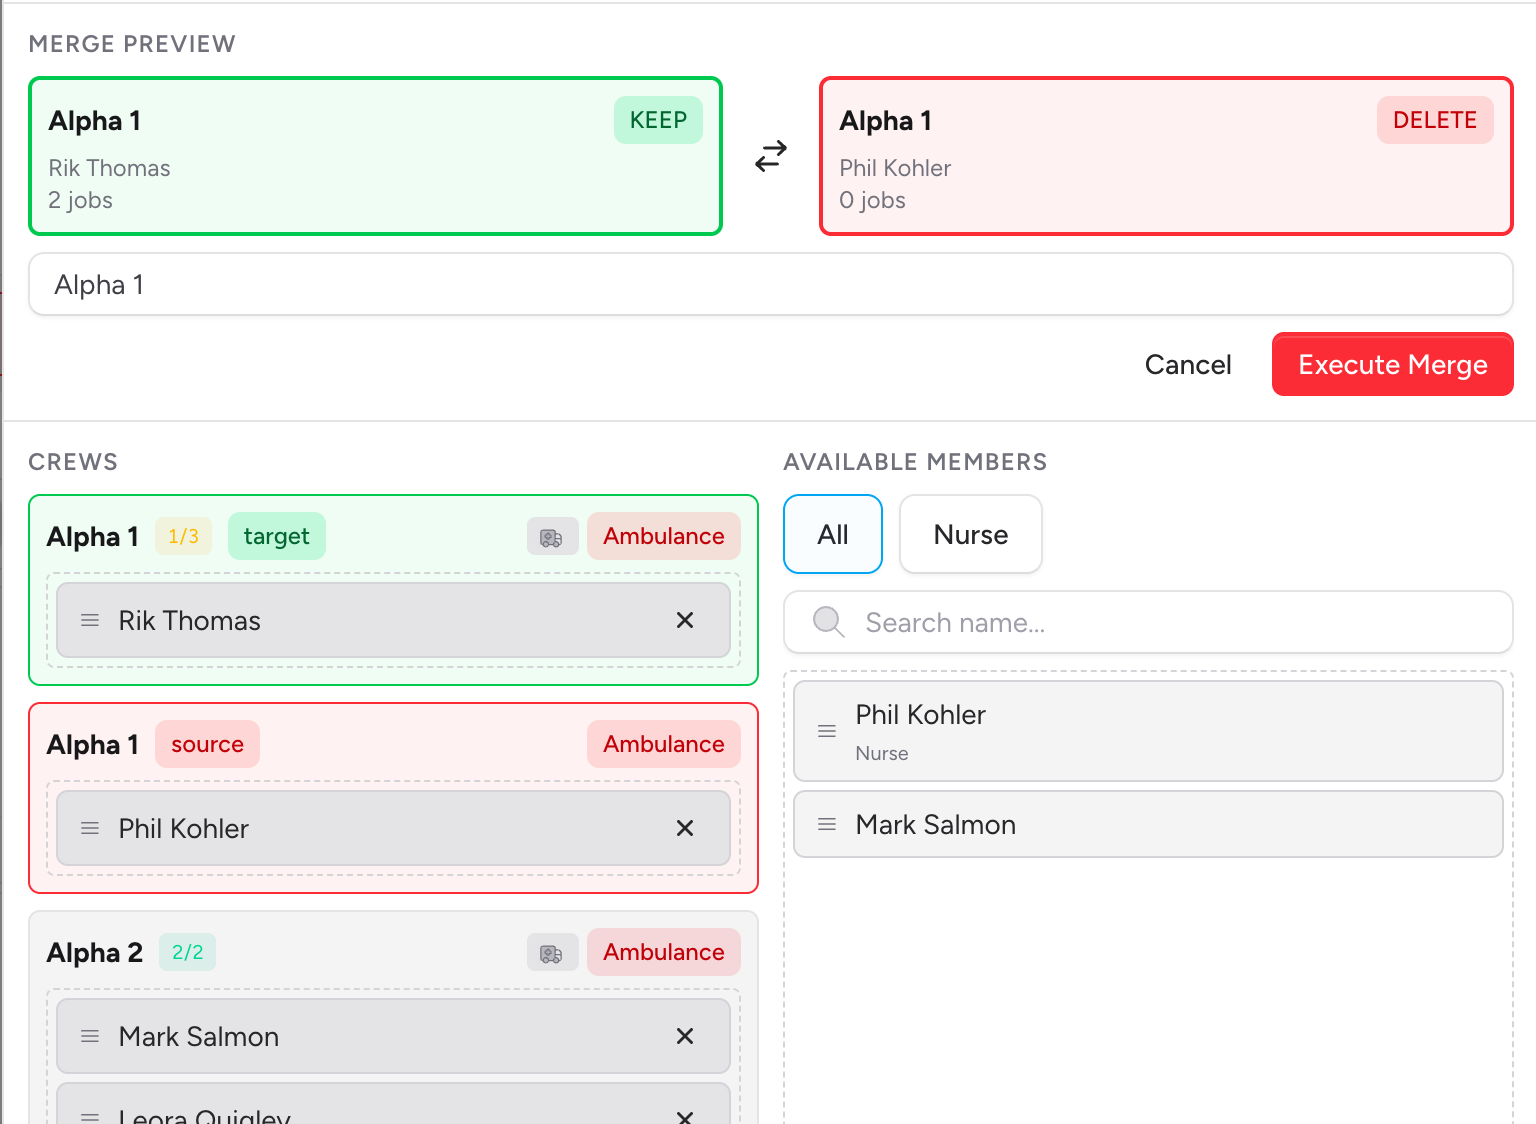
Click Merge in the slideover header to enter merge mode. Click one crew to select it as the crew you're keeping, then click a second crew to select as the one being deleted. A preview panel shows both sides — use the swap button to flip which is kept, edit the resulting callsign if needed, then click Execute Merge to combine them. This is permanent: the deleted crew's jobs, incidents, and members move to the surviving crew.
Documents
If the event has linked media (photos, PDFs, and similar), a Documents button appears in the header showing a count. Click it to open a grid of files — click Open on any item to view it in a new tab.
Screening (where enabled)
For teams with screening enabled on a series event, a collapsible Screening panel appears below the crew board, and a Screening +ve figure appears in the KPI strip. See Screening Surveillance Reporting for details on how screening results are recorded and reported.
Keyboard Shortcuts
Shortcuts are disabled while typing in a text field, search box, or dropdown.
| Key | Action |
|---|---|
| N | Open the New Job modal |
| B | Toggle the Crew Builder |
| F | Toggle fullscreen |
| L | Switch between the Locations and Event Log tabs |
| T | Toggle light/dark theme |
| I | Raise a new M/ETHANE incident |
| 1–9 | Select a crew from the crew board by position, ready to assign |
| Esc | Deselect the current crew and close the Crew Builder |
Role-Based Access
| Action | Team Admin | Event Admin | Team Member |
|---|---|---|---|
| Open the Control Room | Yes | Yes | No |
| Create, edit, and delete jobs | Yes | Yes | No |
| Dispatch and manage crews | Yes | Yes | No |
| Close out jobs (Mark done / Stand down) | Yes | Yes | No |
| Merge jobs | Yes (with permission) | Yes, within their own event | No |
| Move a job to another event | Yes | No | No |
| Raise and manage incidents | Yes | Yes | No |
| Post to the Event Log | Yes | Yes | No |
Unlike the event setup page, the Control Room has no read-only view. Team members without admin access cannot open it at all.
Tips and Best Practices
- Select the crew first, then dispatch. Click a crew on the board (or press 1–9) before clicking Assign on a job — the workflow is crew-first, not job-first.
- Use the shift selector to focus your view. During a multi-shift event, switching to a single shift filters both the crew board and the job feed, cutting the noise.
- The Event Log is for the story, notes on a job are for the detail. Use milestone macros and general notes in the Event Log for things that affect the whole event; keep job-specific detail in that job's own notes.
- Don't forget the completed section when auditing. Closed jobs aren't gone — they're one click away in the Completed list, and can be reopened if closed in error.
- Fullscreen mode is built for a dedicated screen. Press F to drop into fullscreen on a control-desk monitor and keep it running throughout the event.
Troubleshooting
The Control Room button isn't showing on the event page. You need to be a team admin or an event admin for this event. Ask a team admin to check your role or add you as an event admin.
The connection badge is showing Offline or Reconnecting. The Control Room lost its live WebSocket connection. It keeps working from cached data while disconnected, but new changes from other users won't appear until it reconnects. Check your internet connection; the badge will turn back to green automatically once it reconnects.
I can't select a crew to dispatch. Crews in the Uncrewed lane can't be selected — they have no members assigned. Add members via the Crew Builder first.
The Assign button isn't showing on a job card. You need to select a crew from the crew board first — the Assign button only appears on job cards while a crew is selected.
I don't see the Merge job option. Merging requires the Jobs: Merge team permission, event admin access to the job's event, or MOS access. Ask a team admin if you need it.
A note or milestone I posted to the Event Log isn't showing a delete option. You can only delete your own notes, and only your own. There's no way to edit a posted note — delete it and repost if you need to correct it.
My crew-type filter selection isn't sticking. The filter is stored in the page URL, so it should persist on refresh — but it resets if you navigate away and back in without that URL. Reselect it from the funnel menu above the crew board.
- Managing an Event — set up shifts, venue, and event admins before opening the Control Room
- Assigning Crews to a Job — full detail on dispatching and retrospectively assigning crews to unassigned jobs
- Merging Duplicate Jobs — the full merge workflow, launched from the Control Room
- Deployment Plans — reusable crew layouts you can apply from the Crew Builder
- Screening Surveillance Reporting — the screening panel shown in the Control Room for enabled teams
- Event Config — where a team administrator switches Crew Management between Self-service and Control-room managed
- Working in a Control-Room Managed Team — what changes for crew members when self-service crew management is switched off