 IndieBase

Table of Contents
Planning Jobs in Advance
How to pre-plan a day of transport jobs in the Control Room so your crew opens the app to a ready task list.
Planning Jobs in Advance
Lay out a whole day's transport runs the night before, instead of creating each job the moment it happens.
Overview
Planning Jobs in Advance (sometimes called Job Planning) is built for patient transport service (PTS) work, where you know the day's runs ahead of time rather than responding to live incidents as they happen. Instead of creating jobs one at a time on the day, a coordinator can sit down beforehand and add every scheduled run to the event.
Each planned job is a placeholder — a journey, type, priority, up to four optional planned times, and optional patient details. Nothing happens to your live jobs feed or any of your team's other events until a crew member taps Start on one, at which point it becomes an ordinary job that behaves exactly like any job created the usual way.
Before You Start
- Your team must have Job Planning switched on. This is a toggle on the Event Config page and is off by default — see that doc for how to enable it.
- The event itself must also have Job planning switched on. Each event opts in individually — see Turning Job Planning On for an Event below.
- Job Planning requires an active subscription, in the same way Event Config does.
- You need permission to manage jobs on your team (the same permission that lets you create and edit ordinary jobs). Any team member with this permission can add, edit, and cancel planned jobs — it isn't restricted to administrators.
- You'll be working from an event's Control Room, so the event must already exist. See Setting Up a New Event if you haven't created it yet.
Turning Job Planning On for an Event
Once your team's Job Planning setting is on, each event decides for itself whether planned jobs apply there. The per-event toggle is off by default, so a standard event-medical event never gains a planning panel it doesn't need — you switch it on only for the events (typically PTS days) you actually plan in advance.
The Job planning switch appears in two places, and only for teams with the team-level setting on:
- When creating an event — on the first step of the New Event form, just below the Event Type field.
- On an existing event — open the event page, click the pencil icon to edit the event details, and use the same switch there. Save the event to apply it.

Turning It Off Again
You can switch Job planning off on an event at any time from the same edit form. If the event still has pending planned jobs, a warning appears before you save:
"This event has N pending planned jobs. Turning job planning off hides them from crews — nothing is deleted, and re-enabling restores them."
The warning is advisory — saving is never blocked. Turning the toggle off hides the Control Room panel and the crews' Planned list for that event, and stops new planned jobs being added, but the planned runs themselves stay safely in place. Switch the toggle back on and everything reappears exactly as it was. (Bear in mind the 14-day automatic removal still applies while the toggle is off.)

Finding the Planned Jobs Panel
- Open the event and click Control Room at the top of the event page.
- Look for the Planned jobs panel. Its header reads Planned jobs — {event title}, {date}, with a calendar icon.
If your team doesn't have Job Planning enabled — or this event's own Job planning toggle is off — this panel simply won't appear, and the rest of the Control Room looks exactly as it always has.
![Screenshot: The Control Room with the Planned jobs panel visible, showing its header "Planned jobs — [Event Title], [date]" and a "Planned job" button in the top-right corner](/docs/images/events/planning-jobs-in-advance/planned-jobs-panel-overview.png)
Adding a Planned Job
Step 1: Open the New Planned Job Form
Click the Planned job button (with a plus icon) in the panel header.
If the panel is currently empty, you can also click Add planned job in the middle of the panel — it does the same thing.
Step 2: Fill in the Details
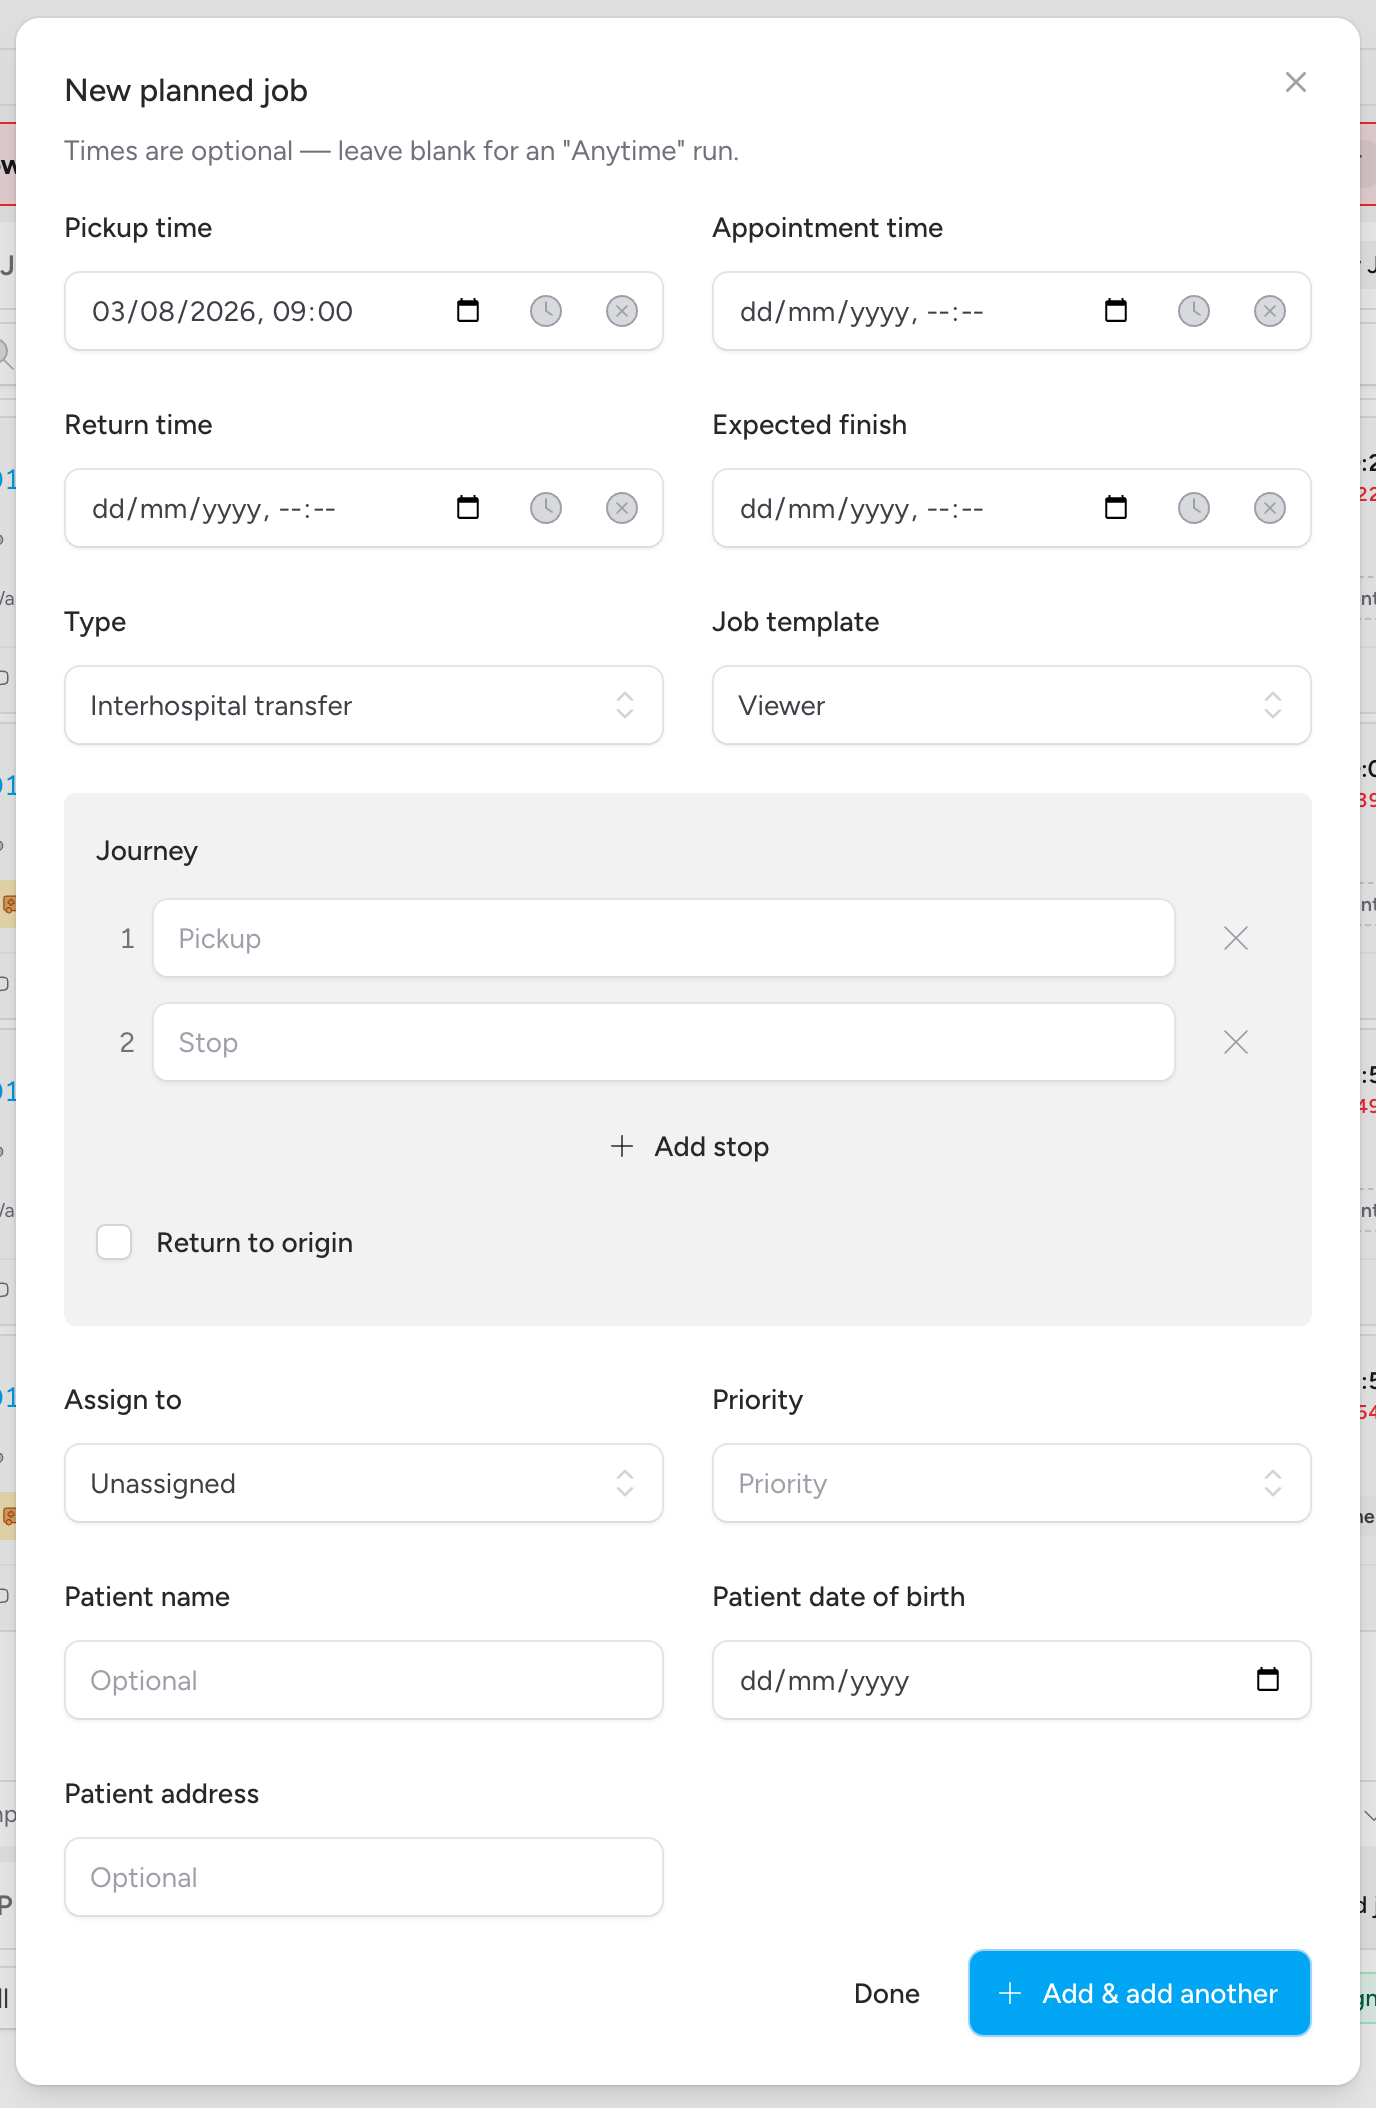
A modal titled New planned job opens. A subheading reminds you that times are optional: "Times are optional — leave blank for an 'Anytime' run."
Fill in as much as you know:
| Field | Required? | Notes |
|---|---|---|
| Pickup time / Appointment time / Return time / Expected finish | No | The four planned times for the run — see Setting the Planned Times below |
| Type | Yes | Selected from your team's configured job types |
| Job template | No | Which of your team's configuration templates the job will use on the day — this decides template-driven behaviour such as the crew time point set, including any custom set composed on that template. It starts on your team's default template, so you only need to touch it when a run should use a different one (a transport template for a PTS run, say) |
| Journey | No | An ordered list of stops, starting with the pickup — click Add stop for extra legs. Typing gives suggestions from your venue's locations if the event has one |
| Return to origin | No | Tick to add a closing stop back at the first location — useful for a wait-and-return run |
| Assign to | No | Assign the run to a crew now, or leave it Unassigned and assign it later |
| Priority | No | Selected from your team's configured priority options |
| Patient name / date of birth / address | No | All optional — you don't need to know the patient yet |
Step 3: Save It
Click Add & add another to save the planned job.
The modal doesn't close. Instead:
- The event, date, type, Job template, and Pickup time you just used stay in place.
- Every other field — Appointment time, Return time, Expected finish, Journey, Return to origin, Assign to, Priority, and the patient fields — clears.
- Your cursor jumps straight to the first Journey stop (the pickup location).
- A small "Added — add another" confirmation appears — unless one of your planned times triggered a warning, in which case the toast shows that warning instead (see Setting the Planned Times below).
This is deliberate — it lets you enter a whole day's runs back-to-back without reopening the form each time.
When you've finished adding runs, click Done to close the modal.
Setting the Planned Times
A planned job carries four optional times, all set on the same form:
- Pickup time — when the crew collects the patient
- Appointment time — when the patient is due, e.g. at a hospital or clinic
- Return time — when the crew collects the patient for the journey back, if there is one
- Expected finish — when the crew is expected to be clear of the run
Pickup and Expected finish together mark out the crew's block of work for the run — this is what IndieBase checks for clashes against a crew's other planned runs (see below). Appointment and Return sit inside that block and are there for your own reference; they don't affect anything else. Leave any of the four blank if you don't know it yet — every one of them is independent and optional, just like the rest of the form.
Soft Warnings
IndieBase checks the times you enter and will warn you if something looks off — but it never stops you saving. A planned run is often a placeholder made with incomplete information, and coordinators generally know their own event better than the system does, so nothing here is a hard validation error. The checks are:
- Out-of-order times. If more than one of the four times is set, they're expected to run pickup → appointment → return → finish. Entering them out of order (for example, a return time earlier than the pickup time) triggers a warning.
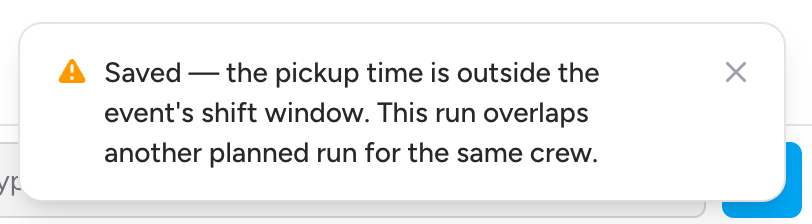
- Pickup outside the event's shift window. If the pickup time falls outside every shift you've set up for the event, you'll be warned — this usually means a typo in the date or an event with no shifts configured yet.
- Crew overlap. If you've assigned the run to a crew, and that crew's pickup-to-finish block overlaps another pending run already assigned to them on the same event, you'll be warned. Runs that merely back-to-back — one finishing exactly as the next starts — don't count as an overlap.
When a warning applies, it replaces the ordinary success message in the toast — for example, "Added — this run overlaps another planned run for the same crew." — instead of blocking the save. The same checks run again when you assign several runs to a crew at once from the bulk toolbar; the confirmation there tells you how many of the newly assigned runs overlap another of that crew's blocks.
Reading the Planned Jobs List
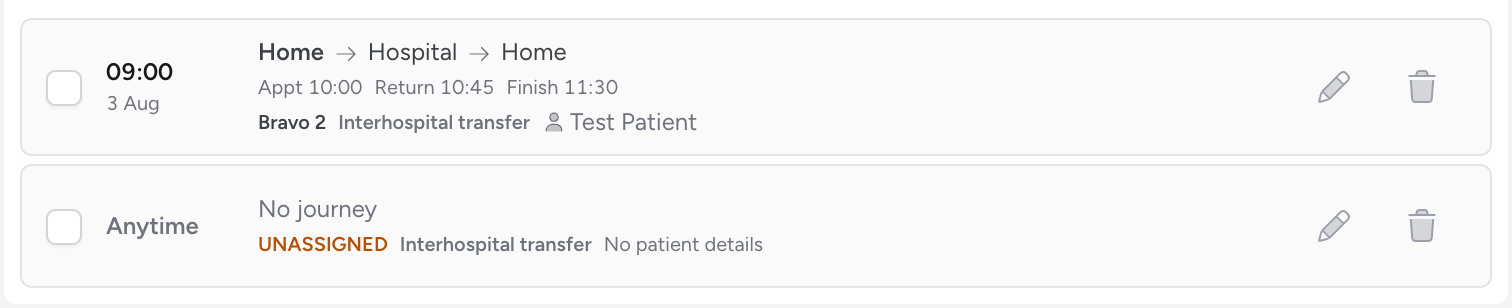
Every planned job you've added for the event appears as a row below the form, ordered by pickup time — runs with a pickup time first, then any "Anytime" runs.
Each row shows:
- When — the pickup time and date, or Anytime if none was set
- Where — the journey, each stop joined by an arrow
- Planned times — a small line beneath the journey showing whichever of Appt, Return, and Finish you've set (omitted entirely if none were)
- Crew — the assigned crew's callsign, or UNASSIGNED in amber if the run hasn't been given to a crew yet
- What — the job type, and a priority badge if one was set
- Who — the patient's name if you entered one, or "No patient details"
Above the list, a crew filter dropdown lets you narrow the list to one crew or the unassigned pool, and a small badge tells you at a glance whether every pending run has a crew assigned ("All N runs assigned") or how many are still waiting ("N runs unassigned").
If there's nothing planned yet, you'll see an empty state instead.
![Screenshot: The Planned jobs panel empty state, showing "No planned jobs yet — add the first run for [date]." and an "Add planned job" button](/docs/images/events/planning-jobs-in-advance/planned-jobs-empty-state.png)
Editing a Planned Job
Click the pencil icon on the right of any row to open the Edit planned job modal. It's the same set of fields as the new job form, pre-filled with the row's current values. Make your changes and click Save.
If the run's Job template has been archived since it was planned, it still shows in the picker, labelled (archived), and the run keeps using it — editing a run never silently moves it onto a different template. You can switch it to any current template, but you can't pick a different archived one.
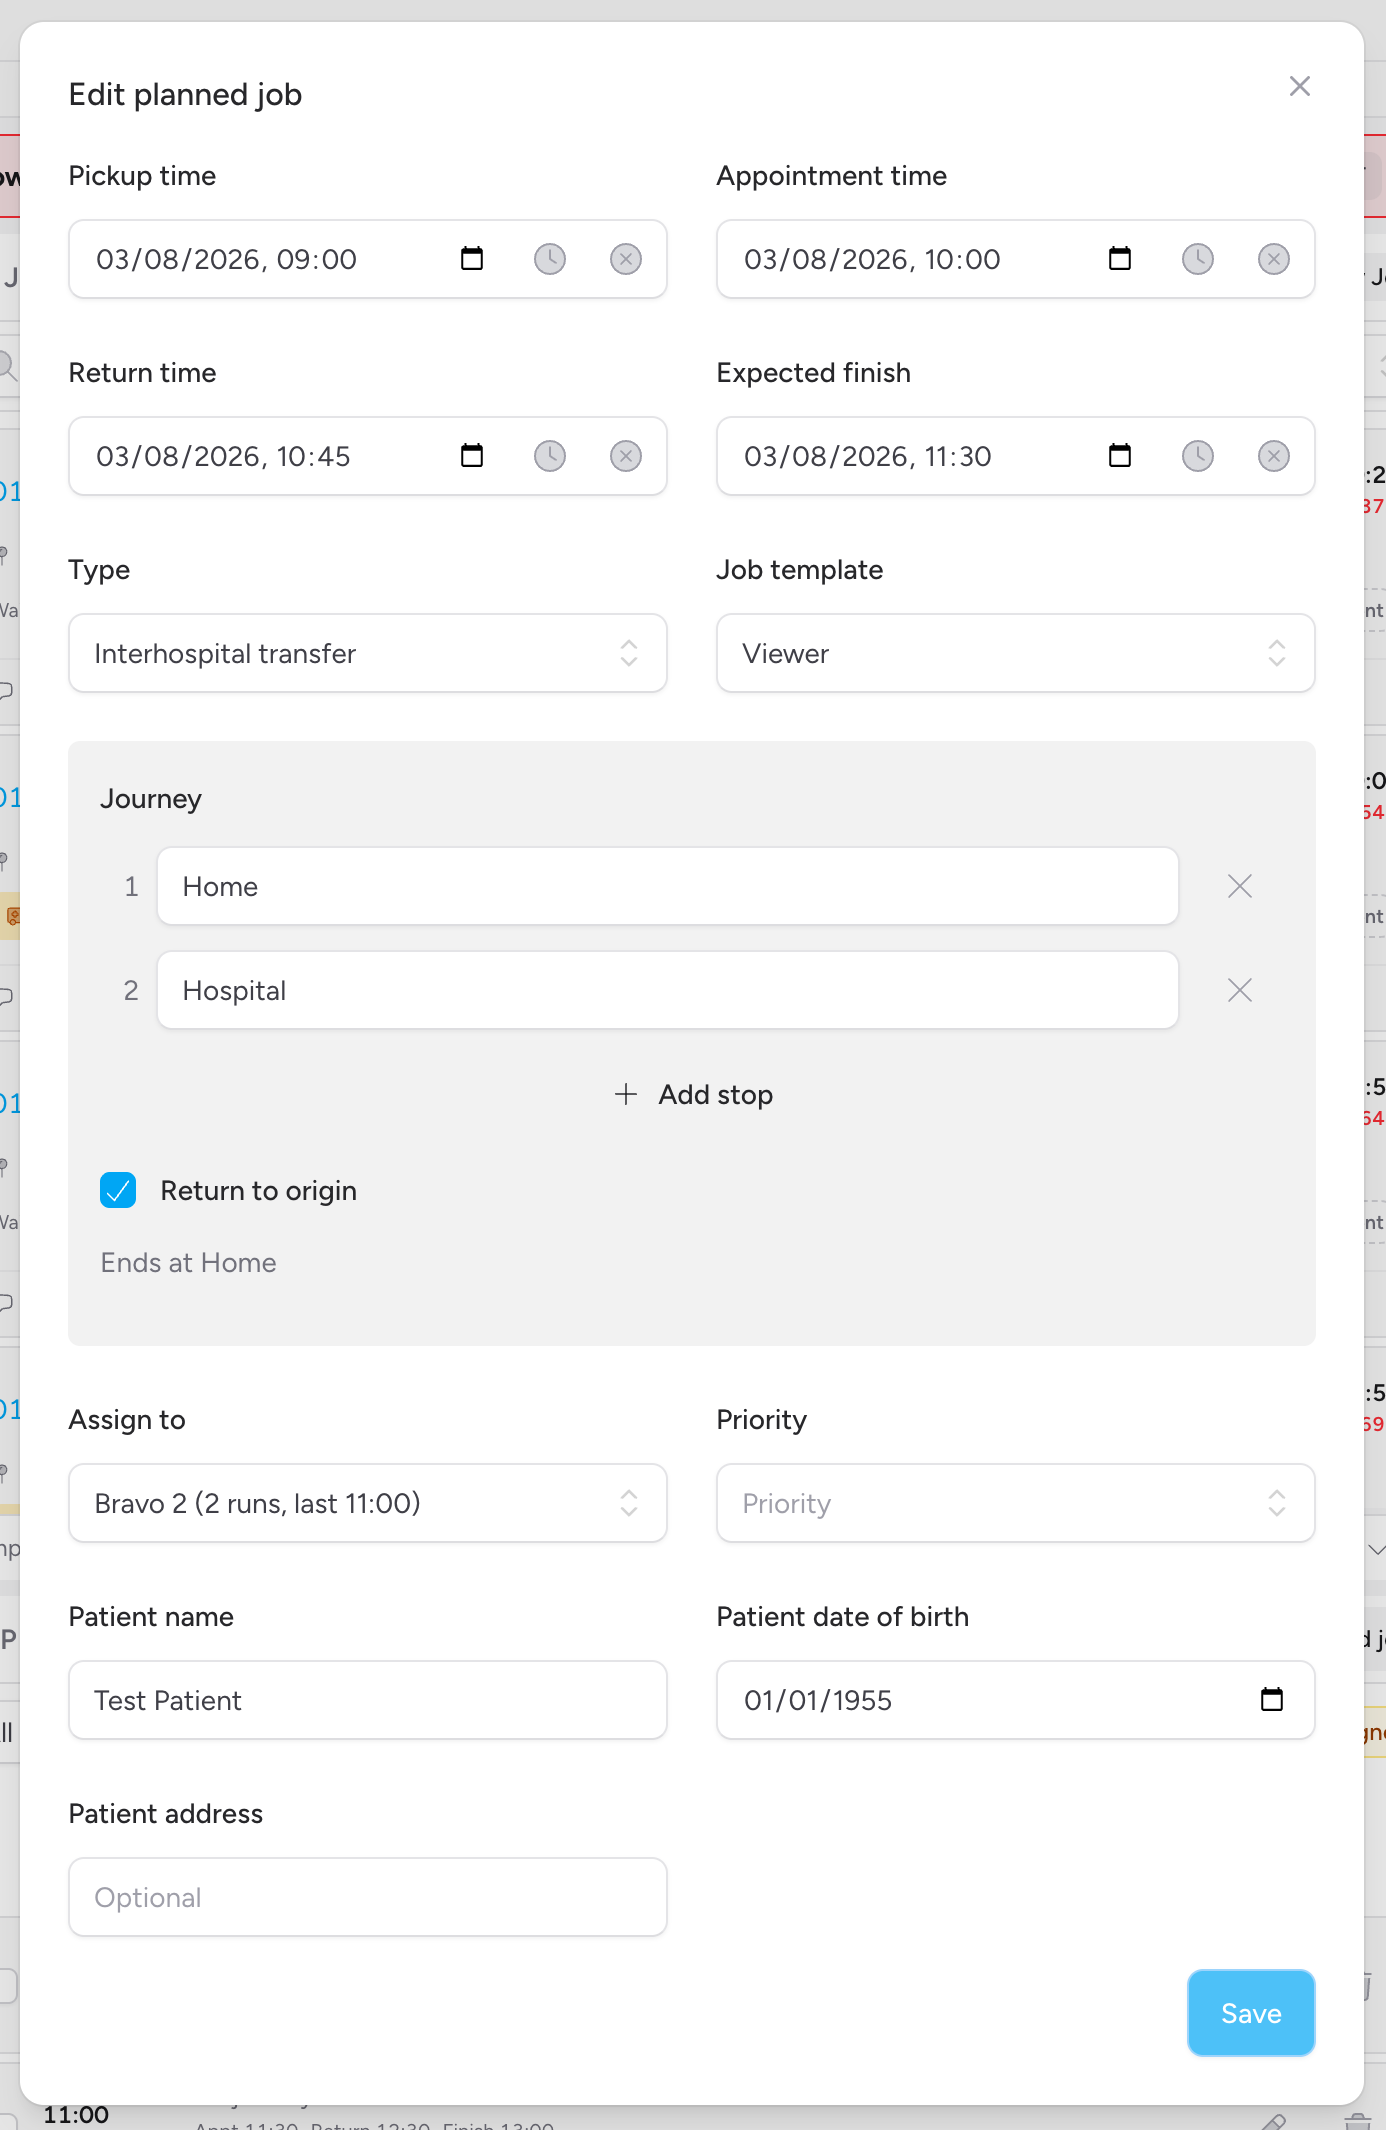
You can only edit a planned job that hasn't been started yet. Once a crew member taps Start, it becomes a live job and no longer appears in this list.
Cancelling a Planned Job
Click the trash icon on the right of a row to cancel it. You'll be asked to confirm:
"Cancel this planned job? Any patient details entered will be permanently removed."
This cannot be undone. Cancelling a planned job permanently deletes it, including any patient name or date of birth you entered. There is no undo and no recycle bin — this is deliberate, to keep patient data from lingering once a run is no longer happening.
Automatic Removal of Old Planned Jobs
Planned jobs that are never started are automatically removed after 14 days. This is a data protection measure, not a bug — it stops old, never-actioned patient details from sitting in the system indefinitely. If you're planning further ahead than two weeks, bear this in mind and re-add any runs that get purged before they're started.
Crew Run Sheets
Each crew assigned planned runs on the event has a printable run sheet — one page per run, showing the journey, the four planned times, and the patient details you've entered, marked Confidential. It's designed to be handed to a crew starting their shift as a paper backup of what they're assigned to that day.
To open one, filter the planned jobs panel to a crew using the crew filter — a Run sheet button appears beside the filter and opens that crew's sheet in a new tab, ready to print.
A run sheet contains patient-identifiable information, so access to it is limited to the same permission that lets you view planned jobs, and every print is recorded in the event's audit trail.
Tips & Best Practices
- Batch your entry. Use the save-and-add-another flow to lay out a whole day in one sitting — since the date, type, and pickup time carry over, you can focus purely on the journey and any patient details for each run.
- Leave times blank when you're not sure. An "Anytime" run is completely valid and is exactly what it's for — don't guess a time just to fill the field.
- Add patient details when you have them, not before. It's fine to plan a run with no patient information and fill it in later by editing the row, or leave it for the crew to complete once the job starts.
- Cancel promptly if a run is no longer happening. Since cancellation is permanent and removes any patient data, don't leave stale planned jobs lying around — remove them as soon as you know they won't be run.
Troubleshooting
I don't see the Planned Jobs panel in the Control Room. Two switches need to be on: your team's Job Planning setting (off by default — ask your team owner or administrator to enable it on the Event Config page) and the event's own Job planning toggle (also off by default — see Turning Job Planning On for an Event). It also requires an active subscription.
I turned Job planning off on an event — where did the planned jobs go? Nowhere. They're hidden, not deleted — switch the toggle back on and they reappear. The 14-day automatic removal of never-started runs still applies while the toggle is off.
I can't add, edit, or cancel a planned job. You need permission to manage jobs on your team — the same permission required to create and edit ordinary jobs. If you don't have it, ask your team owner or administrator.
A planned job I created has disappeared from the list. Either a crew member has already tapped Start on it — in which case it's now a live job on the event — or it's been sitting unstarted for more than 14 days and was automatically removed.
I can't find a location I typed for a stop. Location suggestions only appear if the event is linked to a venue with saved locations. You can still type a free-text location either way.
I got a warning when I saved a planned job — did it fail to save? No. Planned time warnings (out-of-order times, a pickup outside the event's shift window, or an overlap with another of the crew's runs) are advisory only — the run saves regardless. Check the toast message and adjust the times if the warning points to a genuine mistake, or leave it as is if you know better than the check does.
- Event Config — where the Job Planning toggle lives
- Starting a Planned Job — what your crew sees and how they start a planned run
- The Control Room — where the Planned jobs panel sits alongside your live job feed
- Creating Jobs in an Event — creating an ordinary job directly, without planning ahead
- Transport Crew Time Points — the time points your crew records once a planned run has started