 IndieBase

Table of Contents
Crew Time Points
How crews record their time points — the nine-point transport set, and custom per-template sets that any crew type can use.
Crew Time Points
If your team runs patient transport work, your crew panel records the whole round trip — not just a single response — with nine time points instead of the usual five.
Overview
Most IndieBase teams record five time points for a crew: Dispatch, Mobile, Scene, Patient, and Clear. That fits a single emergency response well, but it doesn't capture a patient transport (PTS) run, which typically has several distinct legs — travelling to the pickup, collecting the patient, dropping them off, handing them over, and sometimes bringing them back again.
Jobs on a template set up for transport work show a longer, differently-worded set of time points on the same crew panel: Allocated, Mobile to Pickup, Arrived at Pickup, Patient Aboard, Arrived at Destination, Handover Complete, Collected for Return, Arrived Back, and Run Complete. They live in exactly the same place as the standard five, and work the same way — this doc covers what's different.
Before You Start
- Which set a job uses is decided by its job template (configuration template), so it's chosen job by job — a team can run emergency and transport work side by side. Each template picks its set on the team configuration screen: a team admin edits the template and chooses Emergency, Transport, or Custom under Crew time points on the Crews section. See Custom Time Point Sets below for composing your own.
- When a coordinator plans a job in advance — available when both your team's Job Planning setting and the event's own Job planning toggle are on — the Job template field on the planned-job form decides which set the crew sees when the run starts. Jobs that don't come from a plan use the team's default template.
- If you're not sure which set a job uses, open its Crews panel — if you see five fields ending in Clear Time, it's on the standard (emergency) set; if you see nine fields ending in Run Complete, it's on the transport set.
- You need a crew set up before any of this applies. See Setting Up Your Crew if you haven't done this yet.
Where to Find Them
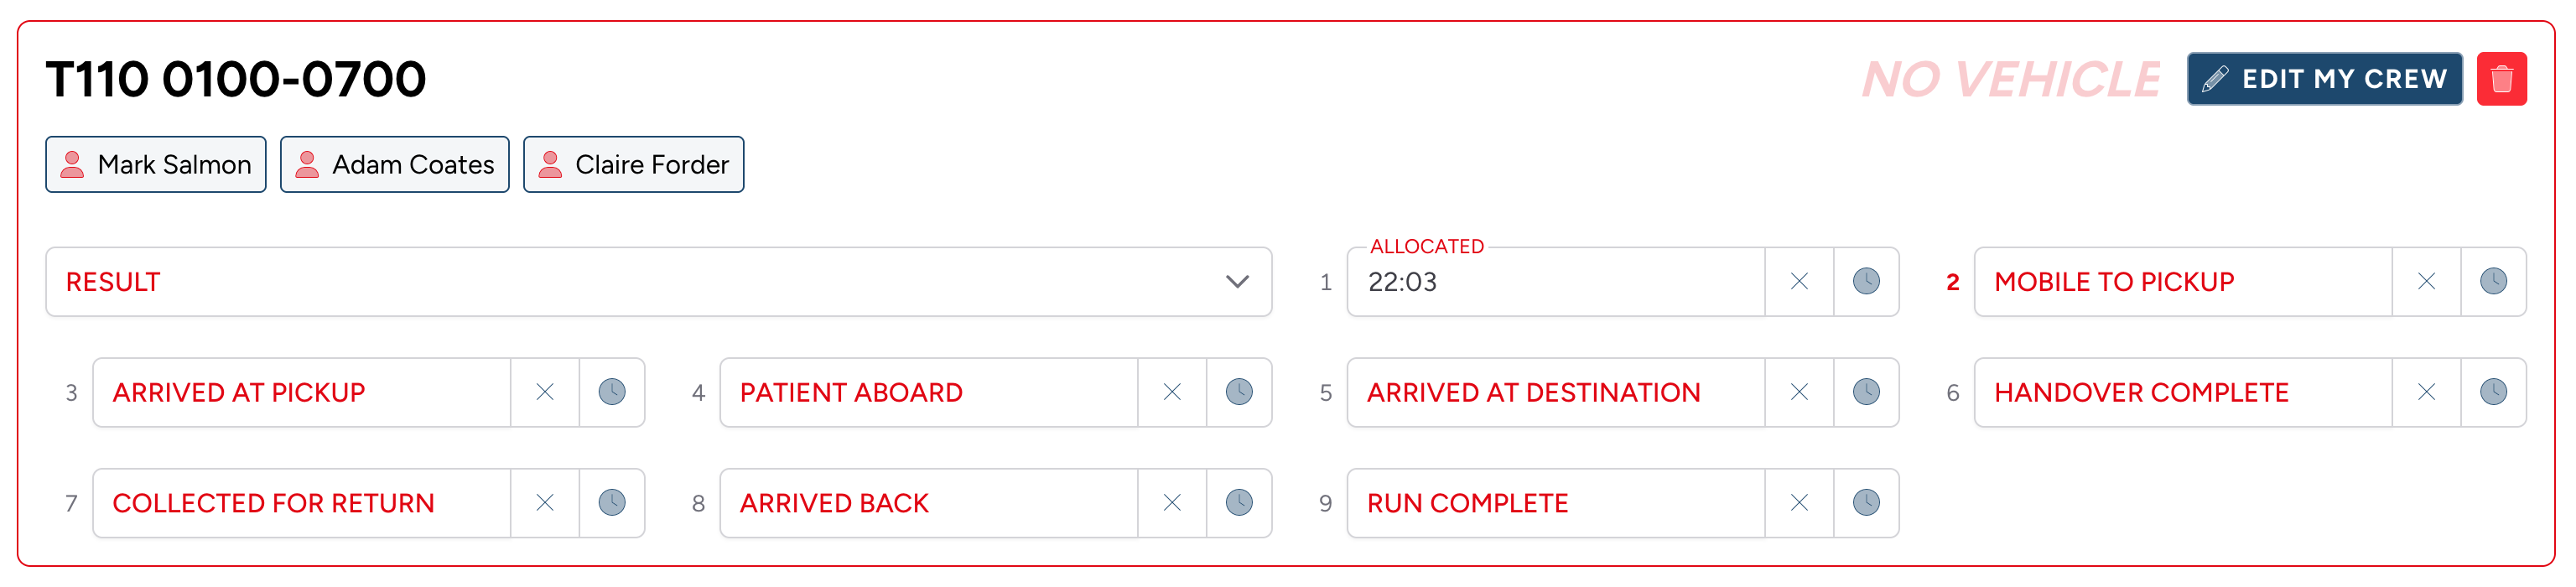
The nine time points live on the Crews panel of a job — the same panel documented in Adding a Job. Open a job, go to Crews in the sidebar, and you'll see them laid out in a grid alongside the crew's Result field.
The Nine Time Points
Each field represents one stage of the run, always shown in this order:
| # | Time point | Records |
|---|---|---|
| 1 | Allocated | The run was allocated to your crew |
| 2 | Mobile to Pickup | You set off towards the pickup |
| 3 | Arrived at Pickup | You arrived at the pickup location |
| 4 | Patient Aboard | The patient is aboard and you're underway |
| 5 | Arrived at Destination | You arrived at the destination |
| 6 | Handover Complete | Handover to the receiving team or facility is finished |
| 7 | Collected for Return | The patient was collected for the return leg |
| 8 | Arrived Back | You arrived back at base (or the return destination) |
| 9 | Run Complete | The run is finished |
If a run doesn't have a return leg, just leave Collected for Return and Arrived Back blank and go straight to Run Complete once you're done — every field here is optional, the same as the standard five.
Custom Time Point Sets
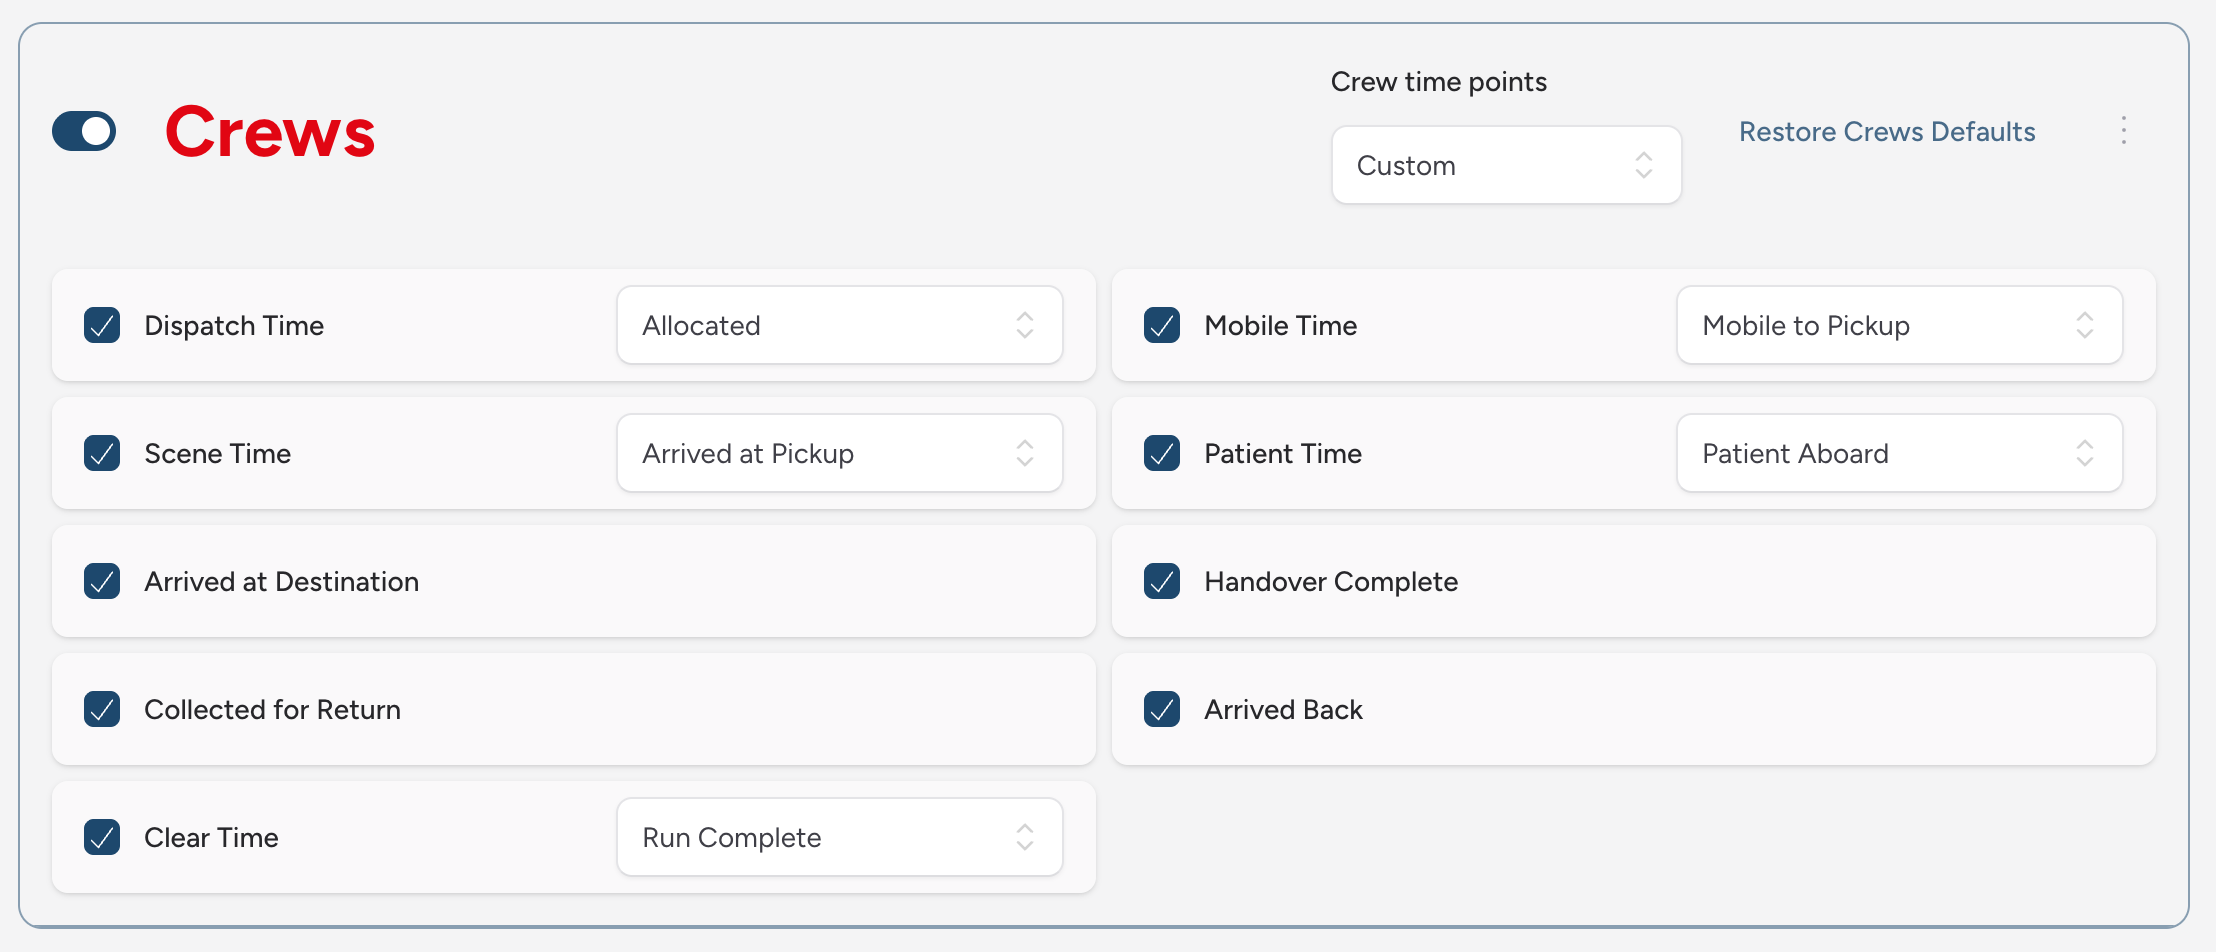
If neither preset fits a template's work — say your day-transfer runs only ever need four of the nine points — a team admin can compose a custom set for that template:
- On the team configuration screen, edit the template and go to its Crews section.
- Under Crew time points, choose Custom.
- A composer appears, pre-ticked with the set the template was already using — so you prune from a working set rather than building from scratch. Untick the points the template doesn't need, and tick any it does.
- For the five shared points (Dispatch, Mobile, Scene, Patient, and Clear), a wording picker lets you choose between the standard name and the transport wording — for example Dispatch Time or Allocated. The other four points only have one wording. There's no free-text option; wordings come from the curated list.
A few rules to be aware of:
- The run order is fixed. A custom set chooses which points appear, never their order — points always show in the canonical sequence listed above, and the sequence cue numbers them 1, 2, 3… even if the set skips points in between.
- A custom set needs at least two points. The composer won't let you untick below two, and a template saved with fewer (for example by an integration) falls back to the standard emergency set until it's fixed — the composer shows a warning when this applies.
- Dispatch, Scene, Patient, and Clear feed job statuses and dashboards. You can omit them, but the composer will warn you that jobs on the template will show less of their progress on those surfaces.
- The printed Patient Report still uses the standard names, exactly as it does for the transport set — see Where Else These Times Appear.
Changes autosave as you tick and untick, and apply to that template only — jobs on your other templates are untouched.
Recording a Time
Each field works exactly the same way as the standard set:
- Tap the clock button next to a field to stamp it with the current time instantly.
- Once a field has a value, tap it to edit the date/time directly if you need to correct it.
- Tap the × button to clear a field you've stamped by mistake.

The Sequence Cue
Because there are nine fields to work through instead of five, each one is numbered. IndieBase highlights the number next to whichever field it expects you to fill in next — the first one in the sequence that's still empty — in bold, so you always know where you are in the run without hunting for the right field.

Standing a Crew Down
If you set the crew's Result to one of the stand-down options, the fields that no longer apply disappear:
| Result | Fields hidden |
|---|---|
| Stand Down Before Mobile | Mobile to Pickup, Arrived at Pickup, Patient Aboard |
| Stand Down Before Scene | Arrived at Pickup, Patient Aboard |
| Stand Down Without Patient Contact | Patient Aboard |
This is the same behaviour the standard five-point set uses — see Adding a Job for the Result field itself.
Where Else These Times Appear
Wherever your crew's times show up elsewhere in the app — on another device's read-only view of the job, for example — they use the same nine wordings above.
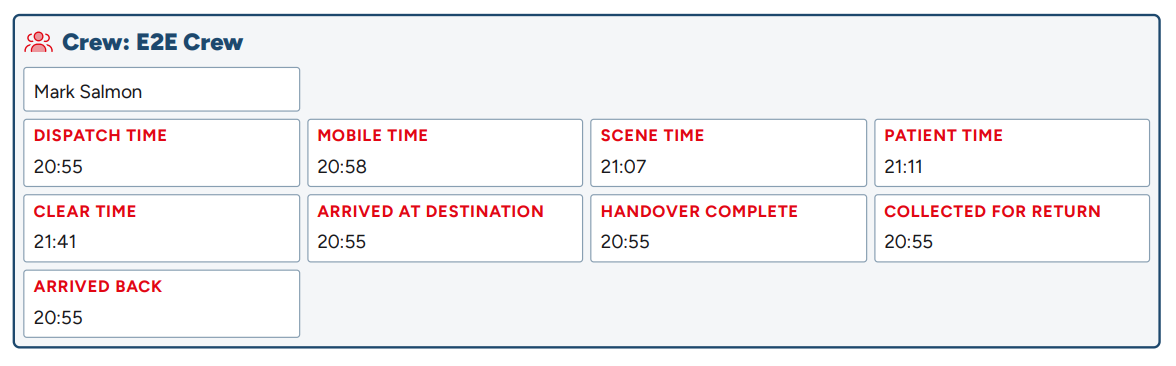
On the printed Patient Report (PRF), times print under their standard names rather than the transport wording. So a time you record as Allocated on the job screen appears as Dispatch Time on the PRF, Mobile to Pickup appears as Mobile Time, Arrived at Pickup as Scene Time, and Patient Aboard as Patient Time. The other five — Arrived at Destination, Handover Complete, Collected for Return, Arrived Back, and Run Complete — print under the same names either way. This is just a labelling difference on that one report; it's still the exact time you recorded.
Tips & Best Practices
- Stamp times as you go. As with the standard five, the fastest and most accurate approach is tapping the clock button the moment each stage happens, not reconstructing it afterwards.
- Use the sequence cue when you're not sure what's next. The bold highlighted number is there so you don't have to remember the order of nine fields — just look for it.
- Don't worry about the return leg if there isn't one. Collected for Return and Arrived Back are only relevant for round trips; leave them blank for a one-way run.
- If a report shows different wording, that's expected. See the note above about the Patient Report — it's not a sign anything went wrong.
Troubleshooting
I only see five time points, not nine. The job is on a template that uses the standard (emergency) time point set. Check which template the job was planned with, and check that template's Crew time points setting — a team admin can change it under Crews on the team configuration screen.
A time point I expected has disappeared. Check the crew's Result field — some stand-down results hide the time points that come after the point the crew stood down at. See the table above.
The wording on the printed PRF doesn't match what I typed on the job screen. This is expected for four of the nine time points — see Where Else These Times Appear above. The underlying time is unchanged; only the label differs on that one report.
I can't tell which field to fill in next. Look for the bold, accent-coloured number next to a field — that's the next one IndieBase expects.
- Adding a Job — the Crews panel these time points live on
- Modifying Crew Times and Adding Notes to a Job — how a coordinator records crew times from the Control Room
- Starting a Planned Job — starting a pre-planned PTS run before you begin recording these times
- Planning Jobs in Advance — how a coordinator lays out a day of PTS runs, including planned pickup, appointment, return and finish times