 IndieBase

Table of Contents
Managing Crews
How to create, staff, delete, and merge crews in the Control Room Crew Builder, and select your active crew in the app.
Managing Crews
Crews are your named response units — a callsign, a vehicle, and the people on board. This guide covers everything from creating your first crew to merging duplicates and picking your active crew in the field.
Overview
Administrators build crews in the Crew Builder, which lives in an event's Control Room. Crews built there are immediately available in the app's crew picker, so field crews can select themselves before going to jobs. On self-service teams, field crews can also build their own crew in the app without waiting for anyone.
If you're a team member in the field and just need to select your crew, skip to Using the Crew Picker in the App.
Before You Start
- The Crew Builder opens from an event's Control Room, so you need team admin access, or event admin access for that particular event.
- Team members you want to assign to a crew must already be members of your team.
- Vehicles must be added to your team's vehicle list before they can be attached to a crew.
- Deleting a crew needs the Crews: Delete permission, and merging needs Crews: Update — both admin-level in practice.
- Crews belong to an event and a shift. A crew built in one event's Control Room isn't offered to jobs on another event.
Where Crews Come From
| Surface | Who | What it does |
|---|---|---|
| Crew Builder (Control Room) | Team or event admins | Create crews, assign and reorder members, set crew type, move between shifts, delete, and merge |
| Deployment plans | Team admins | Generate a whole set of crew shells — callsign, vehicle, station, headcount — for every shift when an event is created. See Deployment Plans |
| The app's crew picker | Any crew member, on self-service teams | Build your own crew on the spot, and edit it afterwards. See Setting Up Your Crew |
Everything on this page is unaffected by your team's Crew Management setting (Self-service vs Control-room managed) — admins always build and edit crews from the Crew Builder, regardless of which mode the rest of the team is using. See Event Config for that setting, and Working in a Control-Room Managed Team for what changes for everyone else when it's switched on.
Crew Cards in the Crew Builder
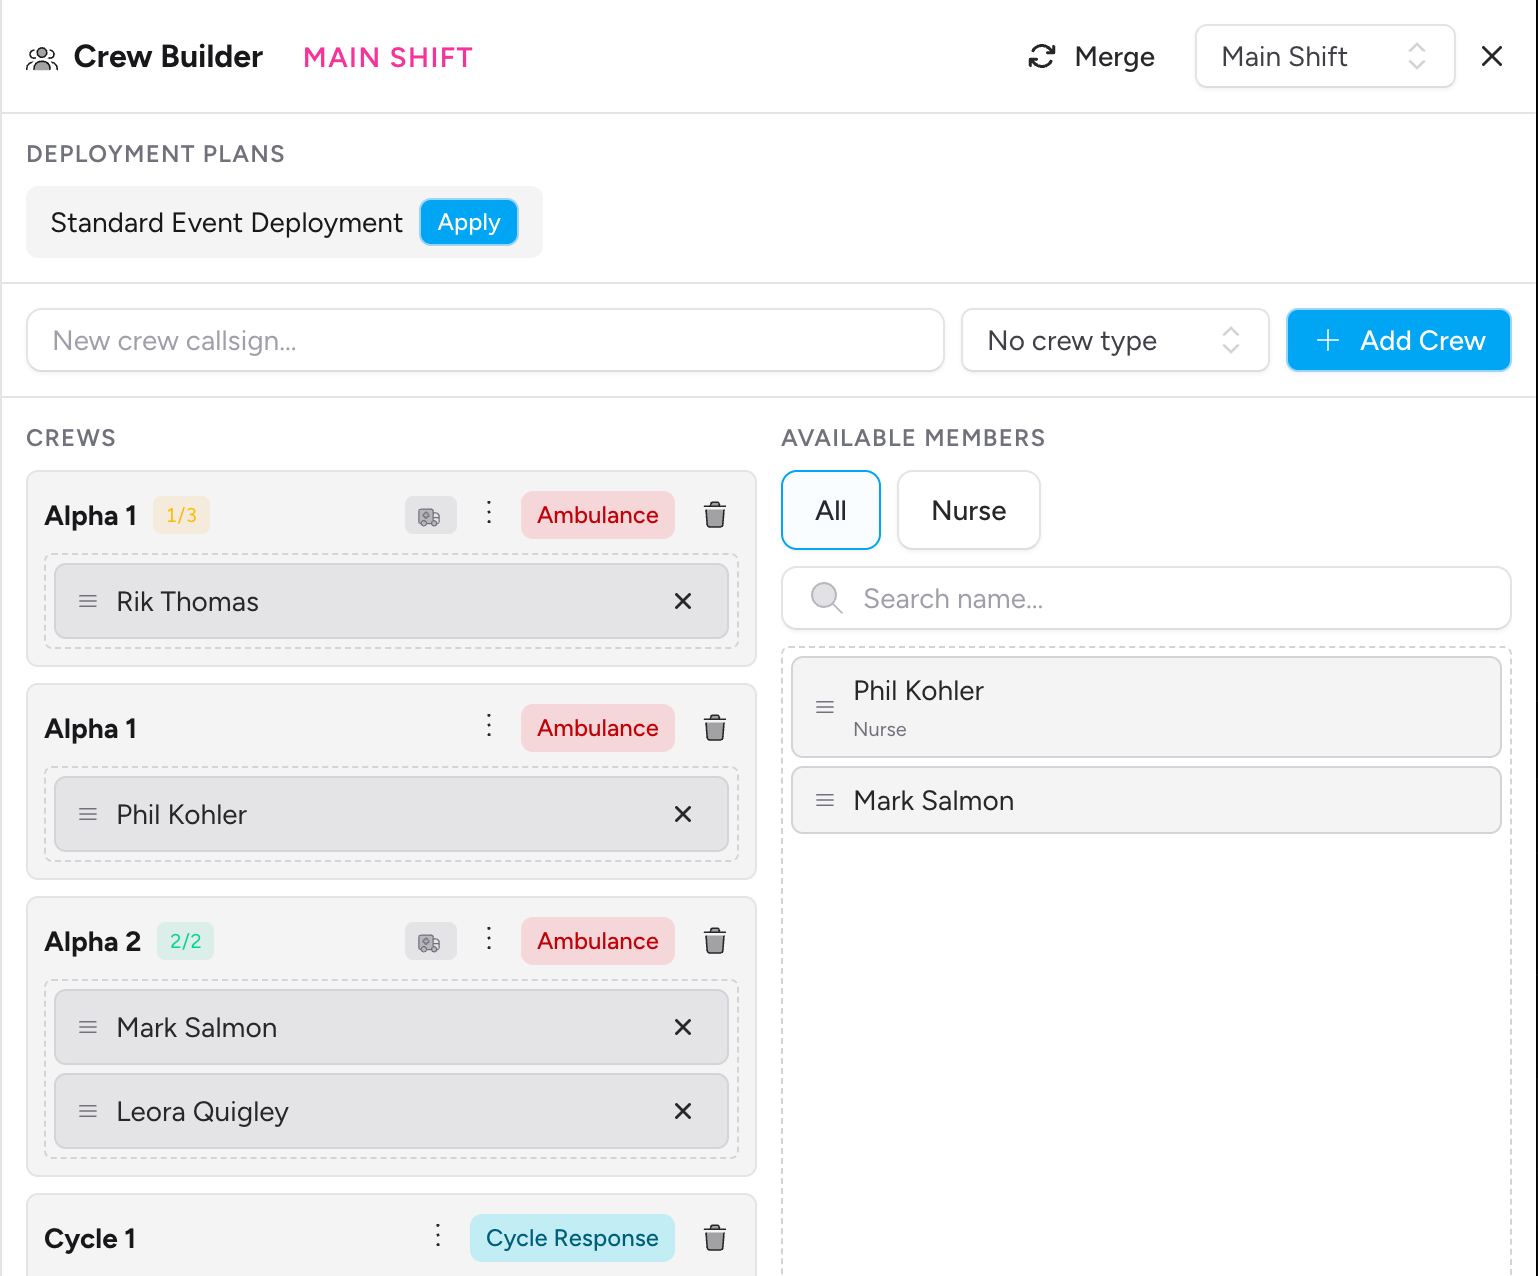
The Crew Builder is a slide-over panel, split into Crews on the left and Available Members on the right. Each crew appears as a card showing:
- The crew's callsign
- The vehicle registration (if one is attached)
- A staffing badge — members on the crew against its target headcount, green once the target is met and amber while it's short. Only shown when the crew has a target headcount, which deployment plans set for you
- The crew's members, each with an × to remove them
- A ⋮ actions menu and a trash button
Creating a Crew
- Open the event's Control Room and click Crew Builder.
- If the event has more than one shift, pick the shift you're building for from the selector at the top.
- Type a callsign into the New crew callsign field.
- If your team uses crew types, choose one from the Crew type dropdown.
- Click Add Crew.
The crew appears at the top of the Crews column with no members yet. Callsign is the only required field — you can add people straight afterwards.

Tip: Keep callsigns short and unambiguous. Single-word or coded callsigns like
MED1orBRAVOare easier to read quickly under pressure than long descriptive names.
Creating Crews in an Event walks through the whole screen in more detail, including the deployment-plan shortcut.
Changing Who's on a Crew
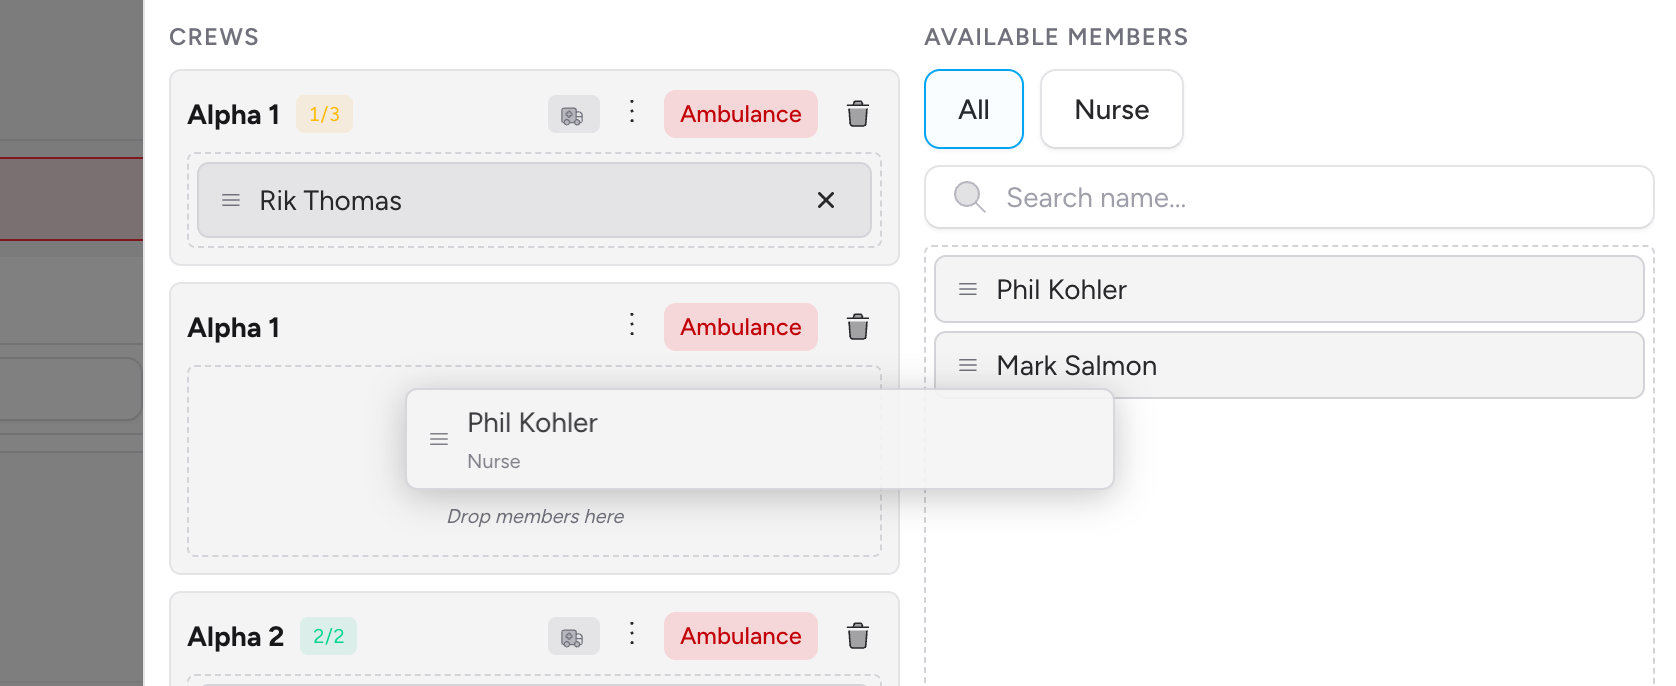
Drag a member's card from Available Members into a crew's member area to add them. Drag between two crews to move someone, or drag them back to the Available Members column to take them off. You can also click the × on a member's card within a crew.
Use the search box and role filter above the Available Members list to narrow a long roster — press / to jump straight to the search field.
Crew Type and Shift
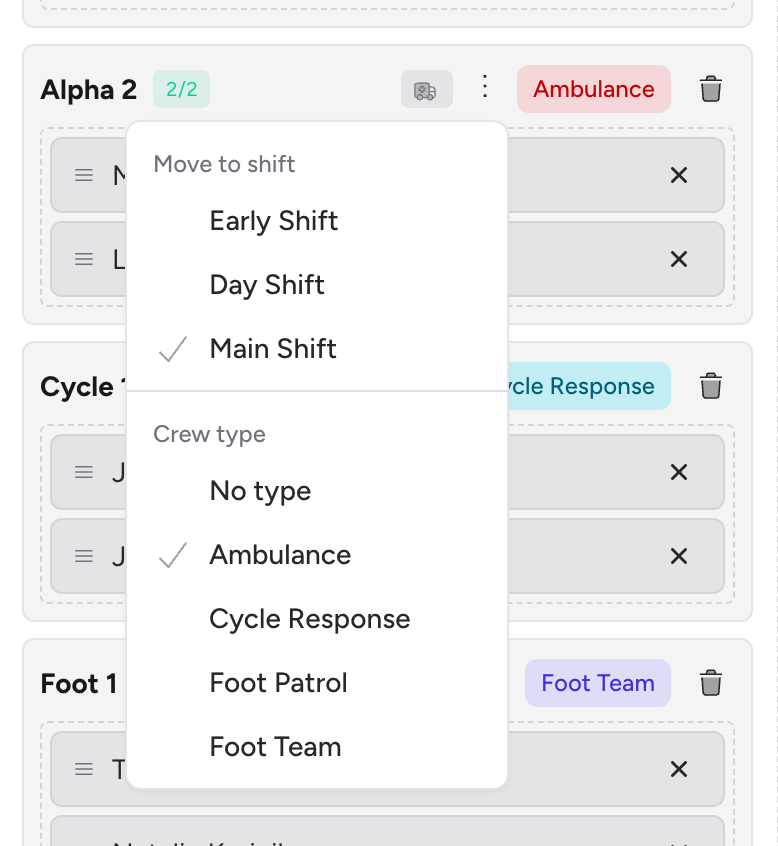
The ⋮ menu on a crew card handles the two things that aren't membership:
- Move to shift — reassign the crew to a different shift on this event. Only appears when the event has more than one shift.
- Crew type — change or clear the crew's type. Only appears when your team has crew types configured.
Renaming a Crew or Changing its Vehicle
Membership, crew type, and shift are all editable from the Crew Builder. Callsign and vehicle are not — the Crew Builder shows them but has no control to change them once the crew exists. There are two ways to correct them:
The crew's own members, in the app. On a self-service team, anyone on the crew can open the Crew Picker (or Edit My Crew on a job) and change the callsign, vehicle, and members. See Setting Up Your Crew. This is the normal route, and it's usually the right one — the people on the crew know what they're driving.
Rename as part of a merge. The merge flow lets you set the surviving crew's callsign, so if you need to rename a crew as an admin, build the correctly-named crew and merge the old one into it. Jobs, incidents, and members all move across. See Merging Two Crews.
On a control-room managed team the in-app edit is hidden from everyone, so a merge is the only route to a rename from the interface. If you find yourself needing this often, it's worth asking whether that team should be on self-service.
Whichever route you take, editing a crew edits it everywhere — historical jobs show the updated callsign, vehicle, and members, because they reference the same crew. Earlier versions offered a "create a new crew instead" option that forked the crew so past jobs kept the old details; that was removed. If a crew's composition genuinely changes mid-event and you need the old records left alone, build a second crew rather than editing the first.
Deleting a Crew
Deleting a crew with no jobs or incidents
- Click the trash button on the crew card in the Crew Builder.
- A confirmation prompt appears — "Remove this crew?"
- Confirm to delete.
If the crew has planned runs assigned to it, the confirmation names them instead: "ALPHA 1 has 3 planned runs. Deleting returns them to the unassigned pool." The runs aren't cancelled — they go back to the pool for another crew to pick up.
Deleting a crew with jobs or incidents
A crew with jobs or incidents attached cannot be deleted. If you try, you'll see an error explaining why:
"Cannot remove MED 1 — it has 3 jobs. If this crew is a duplicate, merge it into the correct crew instead."
This protects your records: deleting a crew that has attended jobs would strip it from those patient records, breaking the audit trail of who responded. If the crew is a duplicate, merge it into the correct crew instead — its jobs, incidents, and members move across, and the duplicate is removed.
Merging Two Crews
Merging crews is only available to team admins.
If you have duplicate or overlapping crews — for example, two crews that should have been one — you can merge them. Both crews must be on the same event.
- In the Crew Builder header, click Merge. The button turns amber to show merge mode is on.
- Click the crew you want to keep. Its card outlines green — this is the target.
- Click the crew you want to absorb. Its card outlines red — this is the source, and it will be removed.
- If you picked them the wrong way round, use the swap control to flip target and source rather than starting again.
- Optionally set a Merged callsign — this renames the surviving crew, and it's the one place an admin can rename a crew.
- Click Execute Merge and confirm.
The confirmation spells out the consequence: "Merge these crews? The source crew will be permanently deleted." If the source has planned runs, it adds how many and notes that merging returns them to the unassigned pool.
After the merge:
- Every job and incident from the source crew is reassigned to the target crew, skipping any it was already on.
- The source crew's members are added to the target crew — nobody is dropped.
- The source crew is removed.
- The target keeps its own vehicle. Only the callsign changes, and only if you set one.
Merging cannot be undone from the interface. There's no fork option to fall back on any more, so if you're unsure, build a fresh crew instead of merging and leave both originals alone.
Finding Jobs Without a Crew
A job or incident can exist without a crew attached — a crew member is never blocked from creating one just because they haven't been allocated a crew yet (see Adding a Job). Two places make these easy to find and resource:
- The Control Room — an amber Unassigned · N chip sits above the job feed, narrowing it down to crewless jobs on that event. See The Control Room.
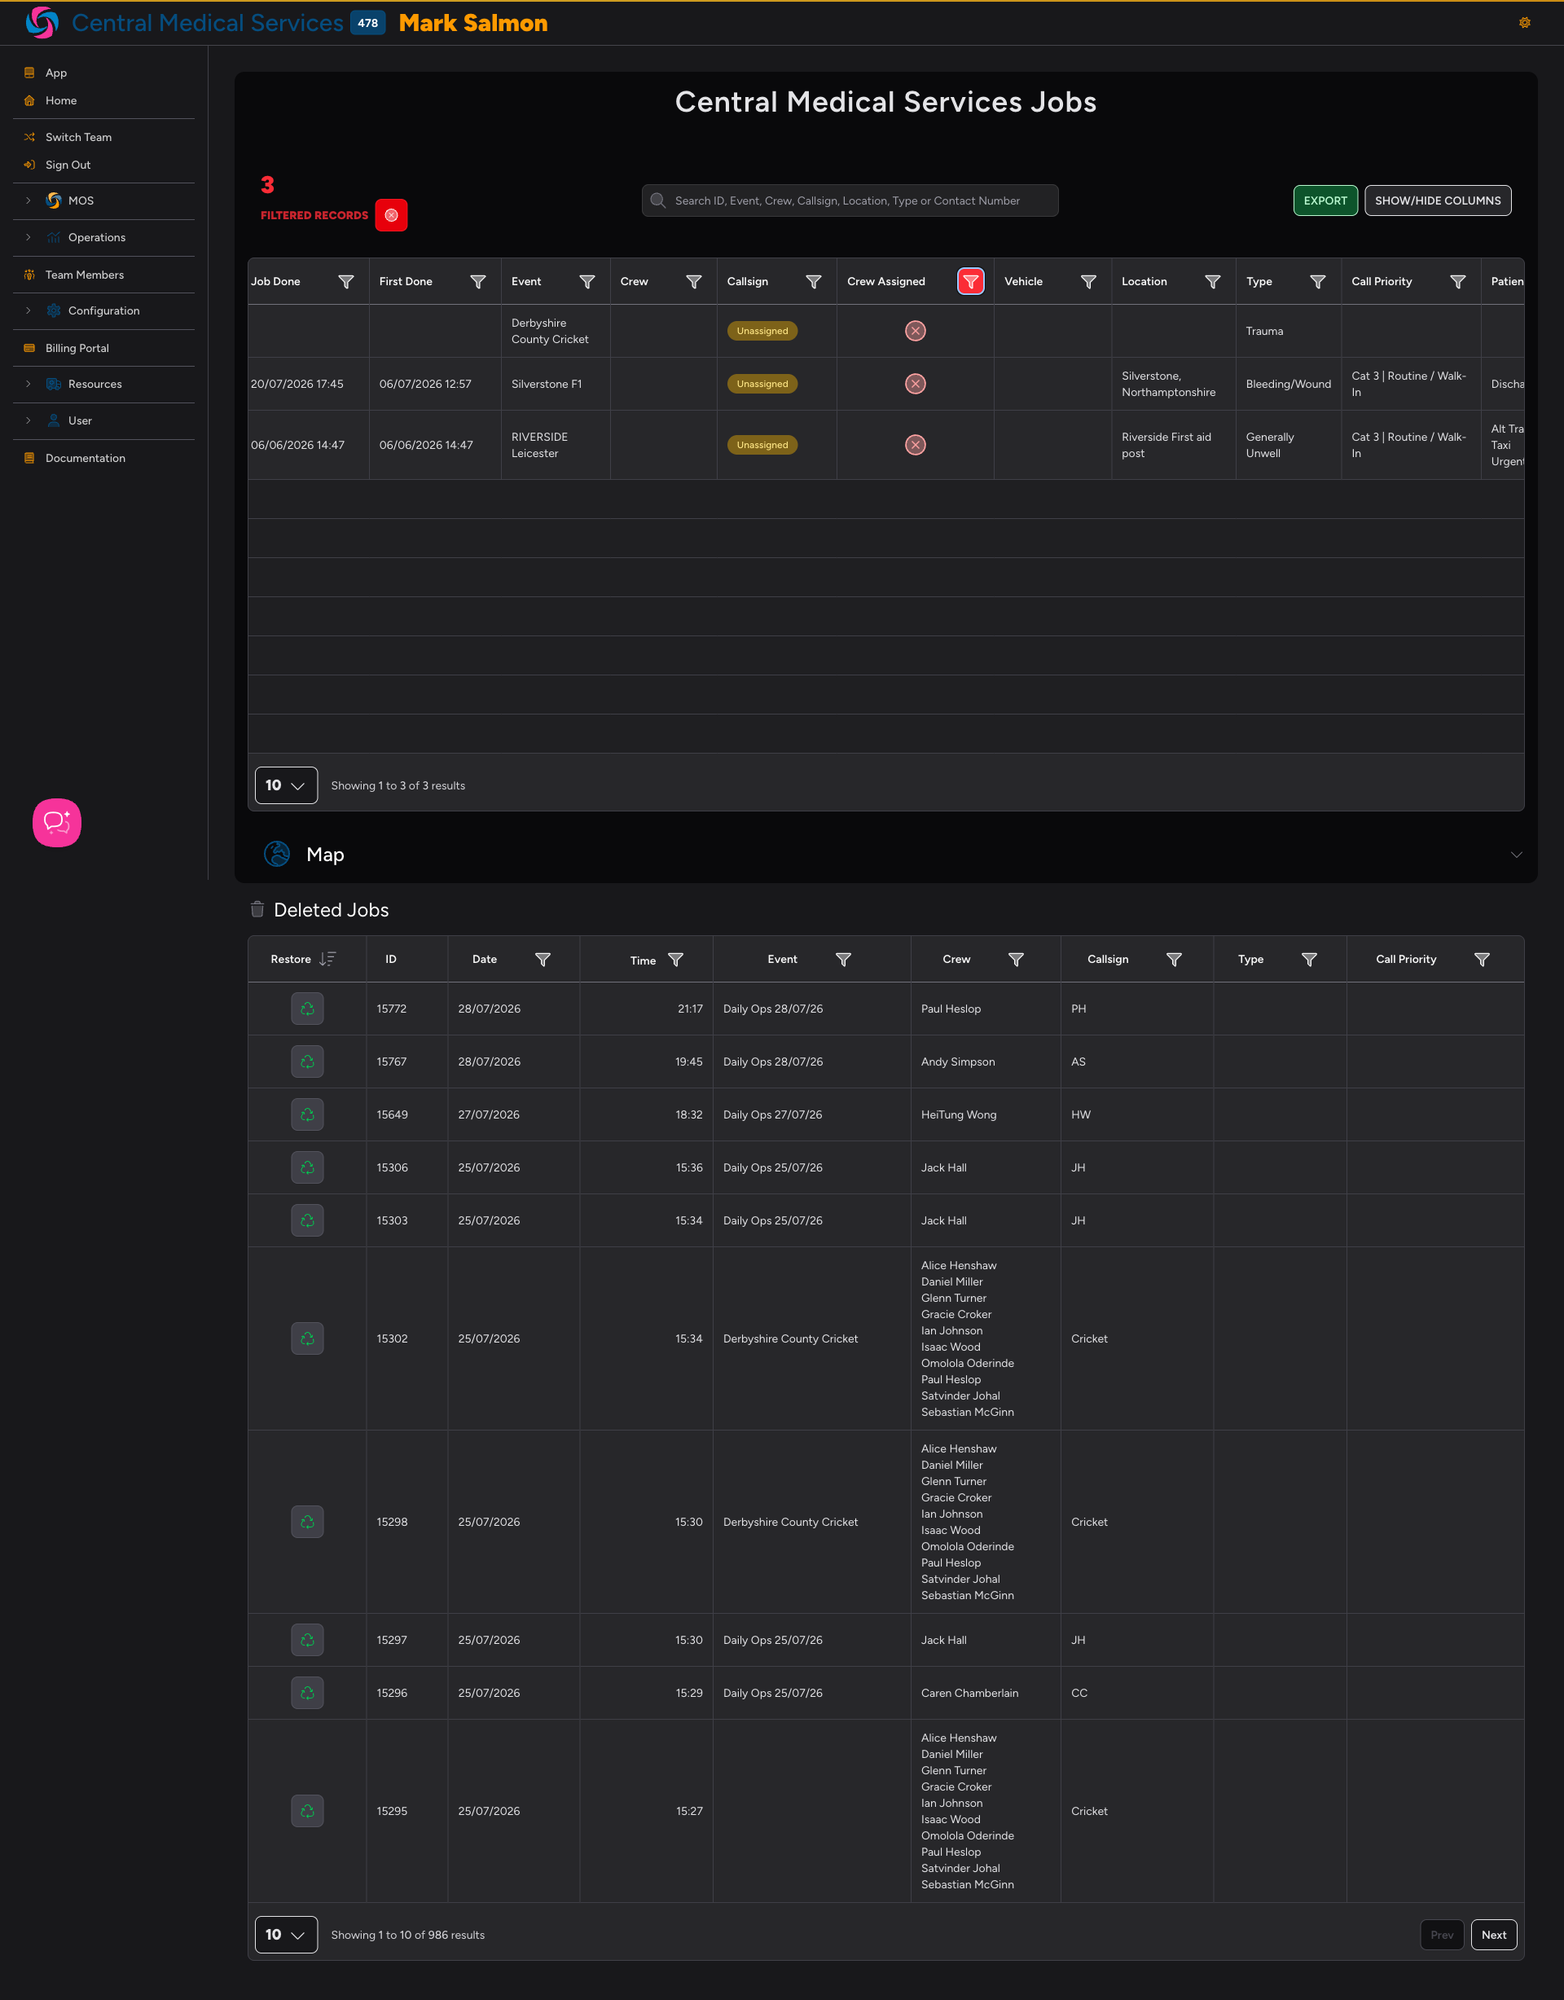
- Browse Jobs — on the team-wide jobs list (under the Team section of the web sidebar), crewless rows show an amber Unassigned pill in the Crews column instead of a blank cell, so they're never mistaken for a loading or missing value. Open the filter panel and set Crew Assigned to No to narrow the whole table down to crewless jobs only — useful for catching day-to-day standalone jobs that a control room dashboard, scoped to a single event, would never show you.
Assigning a crew to any of these jobs works the same way described in Assigning Crews to a Job — select a crew and click Assign, exactly as you would for any other job.
Using the Crew Picker in the App
In the mobile app, tap the CREW button at the top of the Jobs screen to open the crew picker drawer. This is where you select which crew you're part of before going to jobs.
What you'll see in the drawer
The crew picker shows your currently active crew at the top, highlighted, with an edit button if you're allowed to change it. Below that, a Your Crews list offers the other crews you're a member of whose shift is running right now — the crew you're already on isn't repeated, and crews whose shift has ended or hasn't started don't appear. If none qualify you'll see "No crews on shift right now".
Each card shows the callsign, vehicle, event and shift names, and the crew's members. Use the refresh button beside the Your Crews heading to re-fetch the list.
Tap any crew card to select it as your active crew. The drawer closes and your selection is shown in the CREW button.

Auto-detection
The app can automatically detect which crew you should be on, based on the following priority order:
- Shift assignment — if you're assigned to a crew via a shift roster, that crew is selected automatically.
- Event membership — if you're a member of an event crew, and no shift assignment applies, the app selects that crew.
- Cached selection — if neither of the above applies, the app uses the last crew you manually selected.
- Prompt — if nothing can be determined, the app prompts you to choose.
When auto-detection is active, the selected crew card shows an Auto-detected badge (e.g. "Auto-detected from Day Shift").
If auto-detection has picked the wrong crew, simply tap the correct crew card to override it. Your manual selection will be used from that point on.
Creating a crew inline
If you need to create a new crew without leaving the field:
- Scroll to the Quick Create section at the bottom of the crew picker drawer.
- Fill in the Callsign, and optionally a Vehicle, an Event (when your team has live events to choose from). You're added as a member automatically — use Add crew member for anyone else.
- Tap Create Crew.
The new crew is selected immediately and syncs to the server when you're back online.

Quick Create only appears on self-service teams. On a control-room managed team the section is replaced by a note pointing you to the control room.
Creating a crew offline
You can create a crew even when you have no signal. The new crew is saved locally and marked for sync. When your device reconnects, it is automatically uploaded to the server.
Jobs created with an offline crew are still fully recorded. Everything syncs correctly once you're back online — no data is lost.
Tips and Best Practices
- Create crews before operations start. The more complete your crew list is before the event begins, the faster job dispatch will be when it counts. A deployment plan does the whole set in one click.
- Build a second crew rather than editing the first when composition genuinely changes mid-event. Editing a crew rewrites how it appears on every job it has already attended, so if the old records should stand, leave them alone and add a new crew.
- Use merge to clean up duplicates after an event. If two similar crews were created by mistake, merging them tidies everything up in one step — and it's also how you rename a crew as an admin.
- Give crews a target headcount. The staffing badge then tells you at a glance which crews are still short, without counting names.
- Auto-detection works best when shifts are set up in advance. If your team uses shift rosters, the app will pick the right crew automatically — saving field crews the extra tap.
Troubleshooting
I can't find the Crew Builder. It opens from an event's Control Room, and the Control Room itself needs team admin access or event admin access for that event. If you can't see the Control Room button on the event, ask a team admin to grant you event admin access.
There's no button to change a crew's callsign or vehicle. That's expected — the Crew Builder can't edit either. The crew's own members can change them from the app on a self-service team, or you can rename the crew by merging it into a correctly-named one. See Renaming a Crew or Changing its Vehicle.
A team member I want to add is not in the Available Members list. Only users who are members of your current team appear. If a colleague is missing, they need to be invited to the team first. Check the search box and role filter above the list aren't still narrowing it, too.
The vehicle I need is not in the dropdown. Vehicles must be added to your team's vehicle list by an administrator. Ask your team admin to add it under team settings.
I edited a crew and now an old job shows the new details. Jobs reference the crew itself, so an edit applies everywhere that crew appears, including completed jobs. This can't be undone from the interface — if historical records are now wrong, contact your team administrator. To avoid it next time, add a new crew instead of editing an existing one.
The crew I just created offline isn't showing on other devices. Offline-created crews sync to the server when your device reconnects. Until that sync completes, the crew is only visible on the device it was created on. Give it a moment after reconnecting, then refresh on the other device.
I don't see my crew in the crew picker even though it was created in the admin portal. The crew picker only shows active crews for your current team. If the crew was recently created, try pulling down to refresh the crew list. If it still doesn't appear, check that the crew hasn't been deleted or that you're signed in to the correct team.
- Setting Up Your Crew — the original crew setup guide for manual crew configuration in the app
- Working in a Control-Room Managed Team — what changes for crew members when self-service crew management is switched off
- Crew PIN Switching — how to switch between crew members on a shared device using PINs
- Creating Crews in an Event — the full Crew Builder screen tour, including deployment plans
- Assigning Crews to a Job — dispatching and retrospectively assigning crews to jobs
- Understanding Shifts — how shifts and rosters feed into crew auto-detection
- Vehicles — managing the vehicle list available to your team
- Event Config — where a team administrator switches Crew Management between Self-service and Control-room managed